In this post I’m going to describe how to build a simple Tesla Tracker that runs in AWS (see my Github). It’s some Python code that uses an AWS Lambda to gather data from your car, and store it in a DynamoDB database table. Because it’s fully serverless (of course there are servers under there somewhere, but as far as you’re concerned, you don’t need to think about them), it’s amazingly cheap to run. For this application, Lambda costs me zero (given the relatively small number of Lambda invocations I’m making here). The DynamoDB table costs me about 59 cents/month (choose the lowest value you can for “provisioned read and write capacity units” to keep the cost down), and AWS Parameter Store costs me 5 cents per month. So you can see how ridiculously cheap it is to run a serverless application like this in AWS.
In a prior post, I described my first attempt to build a simple means of gathering telemetry data from my Tesla using Tesla’s owner API. I briefly had some fun watching my AWS DynamoDB table fill up with readings showing the location of my car, the temperature, battery level, etc. However, after a while Tesla locked me out of the API, probably because I was creating too many tokens and I wasn’t storing and reusing them properly (lesson learned). Worse, Tesla uses the same API for your mobile app, which is also your key to the car, so that was locked out too!
It turns out that Tesla has now changed the authentication approach on their API to use OAuth2, so I needed to update my approach, anyway.
As before, I’m using:
AWS Lambda as a place to run my code, which wakes up periodically and gathers data from my car, and
DynamoDB, Amazon’s managed No-SQL database, to store the data that’s retrieved.
I made a couple of key changes to deal with the Tesla’s new authentication approach, and also make sure I was storing and reusing tokens properly:
Use the teslapy API. This is a Python library for calling the Tesla Owner API. The volunteer who is maintaining it gives you some good instructions on his Github about how to manage authentication with the Tesla API, and persist the API tokens. Follow the instructions on Tim’s Github regarding how to get your first token. Then you can paste it into AWS Parameter Store (see below) and teslapy should manage renewing the token for you after that.
Use AWS System Manager Parameter Store as a place to persist my tokens. Theteslapy Github shows you how to store your tokens with SQL Lite. But when you’re using Lambda there isn’t really a good place to store the SQL Lite DB between Lambda runs, unless you want to do something like put it in an S3 bucket. But since we’re using AWS, let’s use the native AWS tool for this, not SQL Lite. AWS Parameter Store is tailor-made for this kind of thing. It’s not difficult to use, and you can encrypt your stored credentials. You can look at how I did this in Github.
In my prior post, I included some details on how to zip up any Python libraries that your code depends on (in this case, teslapy) and upload them to Lambda. This can be a little bit tricky (I got it wrong the first few tries) but this blogger gives you exact bash commands to use, so if you follow those instructions carefully it’s not so bad.
To use AWS System Manager Parameter Store, just go into the AWS Console and create a new parameter. I called mine ‘My_Tesla_Parameters’. So that’s where I’m going to store my API tokens. There are actually a few parameters that teslapy wants to persist. So rather then separating them all out and storing them separately, I just stored them as one big JSON. There are 2 kinds of parameters in AWS SMPS–standard and advanced. It turns out that shoving all of my parameters into a single JSON put me over the size limit for standard, so I had to move up to advanced, which costs me 5 cents per month. My lambda code has functions that get and store the parameter JSON in AWS SMPS using the AWS boto API. That way, I get the Tesla API token before making my API calls, and put it back before terminating the Lambda (in case the teslapy API decided to update my token based on whether it found that it was about to expire). Another option is AWS Secrets Manager. For my application, though, Secrets Manager looks like overkill because it seems to be most helpful if you’re rotating credentials. That’s not really relevant here–I’m just storing my Tesla tokens, and teslapy is going to help me refresh them every 45 days or so when they expire.
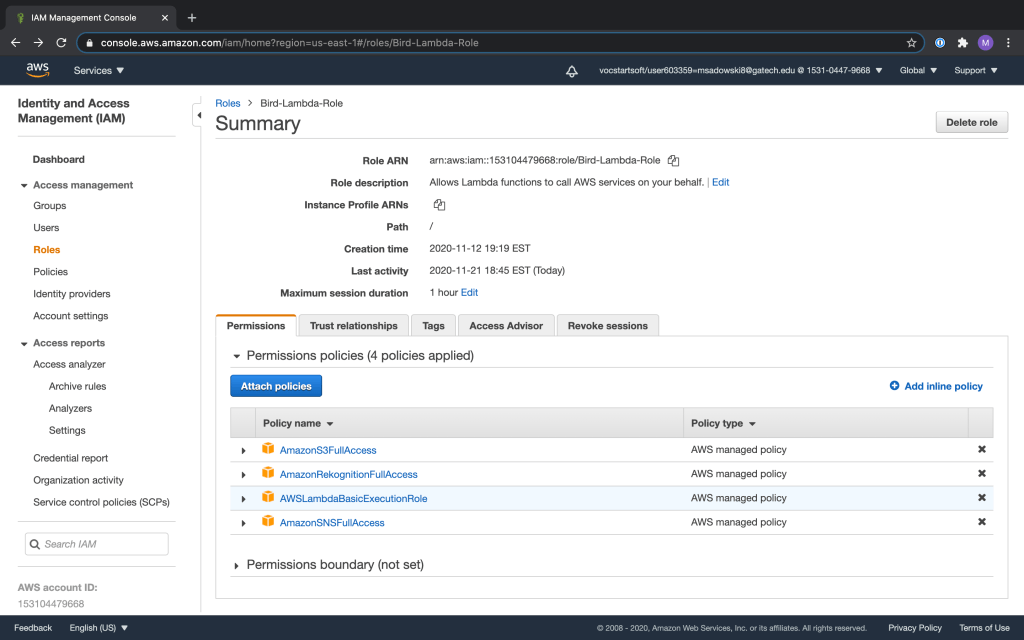
You need to give your Lambda an IAM role that lets it access the various AWS services that it needs, namely, DynamoDB and Parameter Store. When you create a Lambda, AWS gives you the option of creating a new role. That’s a default role that the Lambda will assume, but by default it won’t have access to anything except Lambda. So you can just let AWS create that role for you, but then you need to go into IAM in the AWS Console and find the role and edit it. Add two ‘inline’ policies to allow access to DynamoDB and System Manager Parameter Store. It’s good practice to give those policies the least privileges necessary (i.e., just write access to DynamoDB, and just Put and Get privileges for System Manager Parameter Store).
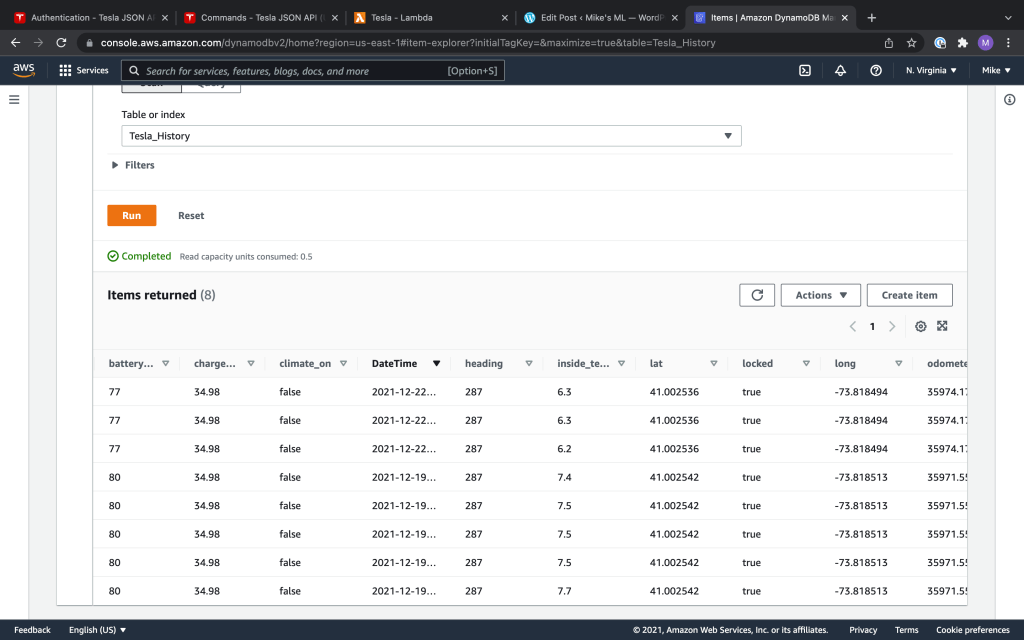
You can use AWS Eventbridge to wake up the Lambda every so often. Below, you can see a few data points in my DynamoDB table, as well as a map showing some of the points captured during a recent trip, and stored in my database.
My plan is to let this run for a while and possibly try to use the data for Machine Learning, or some kind of dashboard application. Things look good after a few days. I haven’t locked myself out of my car yet!
This may or may not be useful to people who are working on projects and need a GPU for cheap. I use AWS at work, but I’ve found their approach to ML is overkill for my basic needs. i.e., you can use AWS Sagemaker’s managed notebooks but connecting it to your code and providing a place to put model checkpoints requires (I believe) hooking it up to an S3 bucket, providing the right bucket IAM permissions, etc. Or you can get an AWS instance with a GPU, but similarly you need to connect it to S3. It’s not that difficult, but it’s some overhead you might not want to bother with if you aren’t too familiar with AWS.
I find Google is easier to work with in this respect. You can use Colab. You get a GPU sometimes, but if you don’t want Google to kill your session at an inconvenient time, you need to pay up for the Pro or Pro+ subscription, which are $10 and $50 per month, respectively. Pro+ is actually a good value. It might be more than you want to spend, although it’s nice because you can run multiple sessions at a time and you get access to good GPUs (e.g., NVIDIA P100).
Another option is a GCP instance, so I’m using that too. With a new account you can get $300 in credits. Fire up a GPU ML instance like this:
You can get a low end GPU instance for about $300 per month. So your credits cover that. You will need to request a quota increase from 0 to 1 GPUs, because the default quota is 0. If you try to launch the instance without this, you’ll find it doesn’t work. So ask for a quota increase to 1 GPU, as follows, and a little while later you should be able to launch a GPU instance.
You can go for a higher-end instance ($1000 a month or so) but just be careful to stop it when you aren’t using it, and delete it once your project is done, just to be sure. I find GCP is much easier to use for training than AWS. You SSH into the instance by clicking the SSH button next to it on the VM Instances screen under Compute Engine. Then, from the browser-based SSH window, you can upload your code and any data you need. No need to connect it to a bucket and work out IAM permissions for accessing it.
GCP’s deep learning images come pre-installed with a lot of python libraries, but if you need more, just pip install them, and you are in business! You can be up and running in just a few minutes, and if you’re careful you should be able to do this for free (within your GCP credits).
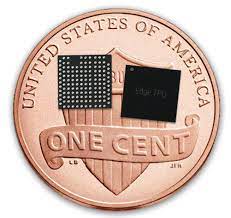
I recently bought a new toy which I think really represents the future of AI. It’s the Coral chip, from Google. Google is a leader in Machine Learning with their Tensorflow platform, and now they are pushing down to the “edge” of machine learning with their Coral chip. This is important because if we can buy low-power, cost-effective chips that can speed up machine learning inferencing, we can run ML at a reasonable price on very low-powered devices such as IoT devices that can’t run ML in the cloud (e.g., because they don’t have the connectivity, or because they need to make quick, autonomous decisions using ML).
Google calls the Coral chip a TPU, for Tensor Processing Unit, because it’s a custom chip that’s designed to natively process tensors, which is how data is represented in neural networks. Because it’s designed to do exactly this, it’s way faster than just using a standard CPU when it comes to doing the math required to do neural network ‘inferencing’, i.e., making predictions using an ML model.
Buying and installing the Google Edge TPU
I ordered the Coral USB accelerator from Mouser. If you like machine learning, it’s a lot fun for just $60. Of course the main idea of the Coral is that hardware makers will build it into their products, but with the USB accelerator, you can easily add it to your Pi. Here, you can see my Pi with the USB accelerator attached by USB.
To install the Edge TPU on your Raspberry Pi, you follow these instructions. They recommend using the ‘standard’ runtime, but they also provide a “maximum operating frequency” runtime, although they warn that if you use this, your USB accelerator can get very hot, to the point where it can burn you! And you need to accept their warning before they even let you install the runtime software that makes the Coral run that fast.
Well, that sounded like too much fun to ignore, so I tried both the standard and the high-speed modes.
It’s fast!
The Coral chip only works with Tensorflow Lite (TFLITE), which is Google’s version of Tensorflow designed for processing at the edge. In a prior post, I used my library of photos taken by my Raspberry Pi of birds at my bird feeder. I sorted the photos into folders named for the relevant species of bird, and fed it into the TFLITE model maker to build a TFLITE model. Then, I took that model and compiled it for the Coral Edge TPU according to Google’s instructions. You can see my Python notebook for training and compiling my model in Github. I got most of this code from examples provided by Google, but if you’re trying to train your own model and run it on a Coral chip, hopefully this will be useful for you. Once you have the model (and the labels in a .txt file), you can use the sample Python code that Google provides to run a TFLITE image recognition model on your Pi. I made a couple minor modifications to this, but nothing much.
Below is a video of a bird being recognized by the model without the Coral chip. The important number to look at is the time to run the TFLITE model, in milliseconds. You can see it takes around 140ms each time we take a grab from the Pi’s video stream and feed it into the model and run it.
Now let’s check out a Goldfinch being recognized by the TFLITE model running on the Edge TPU. Wow! Each call of the model executes in under 7ms! That’s 1/20th of the time it takes to run on the Raspberry Pi’s (low powered) ARM processor.
Just for fun I tried out the “maximum operating frequency” runtime, which Google warned us about. It gets the execution time of my ML model down to around 5ms or so. So that’s around a 25% reduction in execution time vs. the standard Edge TPU runtime, but compared with the time to run the model on the Pi’s CPU (140ms), that 2ms savings is probably not worth the extra power consumption in most cases. If I get a chance I’ll measure the temperature of the TPU after running for a while on the “max” runtime. Maybe I can cook an egg with it.
I’ve been interested in running my bird feeder image recognition model fully on a Raspberry Pi. I’m using a Pi model 4 with the High Quality (HQ) Pi camera to take pictures of the feeder, but so far I’ve only run the Machine Learning model for image recognition in the cloud. Using the fast.ai Python library, I was able to get about 95% accuracy when recognizing 15 bird species that are typically seen in my area.
But the process of sending the image to the cloud, calling the image recognition software, and getting a response back to the Raspberry Pi could take a couple seconds. That’s not fast enough if you need to take a quick action based on the result. For example, I’ve toyed with the idea of recognizing squirrels near the bird feeder and warning them away by squirting them automatically with a hose. To quickly activate the hose when the camera sees a squirrel, we’d want to run the ML algorithm on “the edge”, i.e., on the Pi itself, not in the cloud.
Tensorflow Lite
Tensorflow Lite, by Google, looks like an interesting approach to running ML on the edge. You can get in the game pretty quickly with some tutorials and sample code that Google provides. I took my library of bird pictures, with labels, and used a Python notebook that follows Google’s sample code. The results (around 75% test accuracy) aren’t as strong as those I achieved with fast.ai (about 95%), but they weren’t bad given the limitations of the basic TFLite approach that Google recommends.
Google provides some image recognition models that you can use for transfer learning. Actually they have a whole bunch of these. These models come pre-trained by Google on basic image recognition, so you can use them as a starting point. They have so many that it’s difficult to know which one will be best for your situation without just trying it. I ended up with EfficientNet, which is the default recommended by Google. One issue is that (as far as I can tell) Google’s image_classifier.create API works best when you just leave the weights in EfficientNet’s pre-trained model alone, and only train the neural network layer that you add onto EfficientNet in order to classify the photos in your situation (in my case, determining the species of bird in the photo). If you’re willing to invest more time, I think you could use Keras to try to freeze EfficientNet for a few training epochs, and then allow EfficientNet’s weights to be trained after that. This is what fast.ai lets you do very easily, so I think that’s one reason the results from fast.ai are much better than with TFLite. The other issue with TFLite (at least as I implemented it) was that I was quantizing the model down to 8 bit floating point numbers. You do that to get a speed improvement so that you can run inferencing (i.e., classifying the bird’s species) on your low-powered machine, but you’re making a trade-off that limits the accuracy of your model.
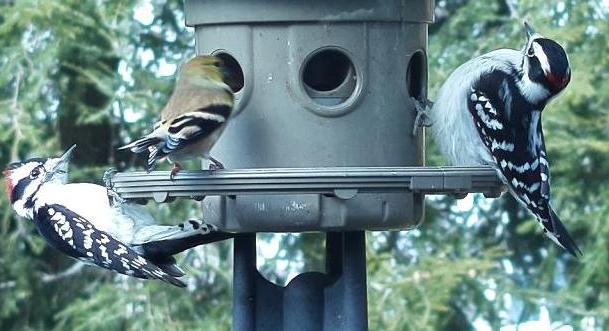
Still, I was able to run the model on the Pi and get some correct image classifications. Here, I’ve included some videos of the model running on my Pi, and recognizing a cardinal and a red-bellied woodpecker. For these, I trained my model using the Python notebook in my Github repo, and then downloaded the model and label files to the Pi. From there, you can just use the sample Raspberry Pi image classification code that Google provides to run the model against a video stream from your Pi camera. The code will run TFLite inferencing against a series of shots from your camera, and it will annotate the video steam with the result. You can see the label and the probability that the model assigns to the classification right on the video. Now these particular species are colorful and relatively easy to identify. When it comes to less distinctive birds like sparrows and finches, the TFLite model does noticeably worse than my fast.ai model.
Given my experience with TFLite, I’d say it will work well to give you a quick answer to a simple image classification problem, running directly on your Raspberry Pi. So I think it could be viable for, say, telling a squirrel from a bird. But if you want to accurately distinguish between many species of birds, I think you’re better off using some more computing horsepower and using a more powerful ML library, like fast.ai.
Northern Flicker – These birds have a great time hammering against your house. I don’t think there are any bugs to eat underneath our artificial plank siding, so I think they just do it to make a big racket.
If you read my previous post on my efforts to create an accurate ML-based bird recognition model for use with photos from my bird feeder, you’ll know I was able to obtain validation accuracy of up to 95% using images mainly from the Caltech-UCSD bird image library (after cutting the number of species down to the ones I tend to see at my feeder in the Northeast US). However, my accuracy in identifying the species in actual photos from my bird feeder seemed to be much lower than 95%. I believe that’s because:
The Caltech-UCSD images may have been used to train Resnet, which is a “starter” model that I used to train my custom bird recognition model. That means that Resnet does well at identifying images from that data set because it’s already seen them before. But it doesn’t do as well when identifying images from my bird feeder because, obviously, it’s never seen them before.
Images from my bird feeder just don’t look much like the images in the data set, which I assume were taken by professional photographers, or at least by serious amateurs. Some of my photos are good (if I get lucky), but other times I get a photo of the bird’s rear end, or the bird is moving, so it’s a bit out of focus. Further, I think there’s some benefit to having images that are consistent. My bird feeder is consistently located within my photos, so you could imagine that the ML model is factoring the bird feeder out of it’s decisions regarding which label to assign to new photos, because the bird feeder didn’t play a role in any of the labels assigned to the training images.
So based on these factors, I decided to gather my own library of images and use these to train an ML model. This took a while, but as you’ll see, the accuracy I was able to achieve was quite good.
Technologies Used
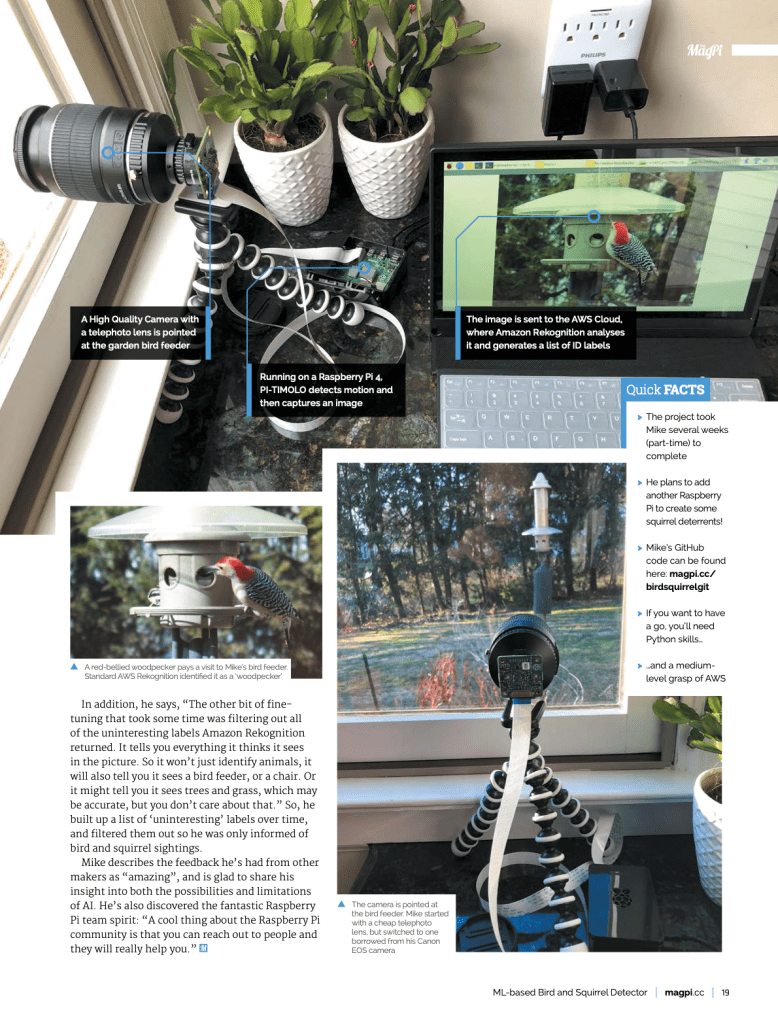
I use a Raspberry Pi 4 with a “High Quality” camera, with a Canon lens borrowed from my SLR camera, which lets me zoom in on the feeder from a spot inside my kitchen. I use PI-TIMOLO, running on the Raspberry Pi, to detect motion and capture a photo.
I’m using the Fast.ai Python library. I’ve found that it’s the quickest and easiest way to get good results. I’ve been playing around with Tensorflow-Lite to see if I can run the ML model on the “edge”, i.e., on the Raspberry Pi, not some high-powered system with a GPU in the cloud. While the results aren’t bad with Tensorflow-Lite (although not as good as with Fast.ai), it requires more fiddling with hyperparameters to get the best possible results. Fast.ai can figure out the best learning rate, for example, and can even adjust it automatically while training proceeds.
I used Google Colab to train the model. Colab gives you free access to a GPU, which is a specialized processor that cuts the training time of a model like mine by about 80%. If you use it too much, Google might cut you off and you can either wait a while until you can use a GPU again, or pay up for their Pro version, which costs $10/month.
Gathering Your Own Image Data Set
Pine Siskin – these aren’t common around Northeast US feeders but their food source in Canada is low this year so we can see them
I put my Python notebook in Github, but I’m not going to include all my images. If you want to try this on your own you’ll probably want to gather your own photos. This wasn’t difficult, but it took some dedication (obsession?) in order to sort through hundreds of photos each day and put the good ones in folders, organized by bird species. Before taking on bird ML as a hobby, I didn’t know much about birds, so I had to ask for help in identifying the birds now and then (thanks, Steve!). By the end, my image data set had about 2000 images of 15 different bird species. I didn’t separate the various sparrow species–I just lumped them together–but maybe I’ll try that later.
Results
In 9 training epochs I was able to get the results below. For the first 3 iterations, the Resnet weights are frozen, but in the last 6 epochs, these can be adjusted. The idea is that it’s not worth adjusting thousands of Resnet neural network weights early in the game, when your model is completely clueless. But once your model has been trained to a reasonable level, you can let fast.ai adjust the Resnet weights to optimize your results.
epoch
train_loss
valid_loss
error_rate
time
0
3.697723
1.892719
0.590698
02:16
1
2.527083
0.875750
0.267442
02:17
2
1.701044
0.560366
0.186047
02:18
epoch
train_loss
valid_loss
error_rate
time
0
0.566087
0.316642
0.100000
02:20
1
0.360757
0.277740
0.083721
02:20
2
0.249010
0.196168
0.067442
02:19
3
0.183660
0.210550
0.067442
02:20
4
0.121282
0.191973
0.053488
02:22
5
0.086573
0.180368
0.051163
02:20
So with an error rate of 0.05, we’re at 95% validation accuracy. Given that Resnet’s never seen these pictures, we hope that this accuracy will carry over to inference on real images captured by the Rasperry Pi, day-by-day. Did it? Yes!
As an example, you can see that in my Python notebook I ran inferencing on 15 additional images, and it got only one wrong. You can see an example of this at the left. Below, you can see the model’s results. It thinks this is a cardinal with very high certainty (0.999), which is correct.
So gathering my own images and training my own model let me achieve quite good accuracy compared with using canned data from a publicly available data set.
I heard that Telsa has an undocumented “owner” API. While Tesla doesn’t support it, some smart people have reverse engineered it, and documented it. Someone even provided a Python library that you can use.
The API is the same one your Tesla smartphone app uses to control your Tesla, but it offers a lot more functionality than the app. So you can find out your battery level or the location of the car, and even take actions like honk the horn or lock the doors. You just need your email address and password to access the API, so I suppose it should probably make you slightly nervous that the North Koreans could roll down your windows and drive your Tesla into a lake.
I put that thought aside, and decided it might be interesting to gather time-series data from my car, and it might be a good source of data for machine learning projects. Maybe I could see how different styles of driving, or weather, affect the car’s mileage, for example. It was fun for a few days, but the fun stopped when Tesla locked me out of the API and my smart phone app no longer worked.
AWS Lambda and DynamoDB
I decided to use AWS Lambda and DynamoDB for this project. If you want to try this (I take no responsibility if Tesla shuts off your access, or if some 15-year olds from your neighborhood hack your car and take it for a joy ride), my code is in Github.
The way this works is pretty simple. The Lambda wakes up periodically and calls the Tesla API to gather a few data points. There are many data points available, but I choose just a subset of these, such as the latitude and longitude of the car, it’s current speed, and battery level. Then the Lambda writes them into a DynamoDB table and terminates.
Building and Configuring the Lambda
The hardest part about this project was building the Lambda so that the AWS Python environment had the necessary external libraries. If you’re just using the AWS Python SDK (boto) in your code, you can just import it without doing anything special. But if you’re using an oddball library like the MyTesla library I was using, you need to zip your Lambda up in a special way, along with MyTesla and the Requests library, and upload the zip file to AWS (either via the Console or the CLI). I found this to be a bit frustrating, maybe because Amazon’s instructions were a bit unclear. I found this set of instructions to be helpful, though.
Once you’ve got the Lambda zip file uploaded, you set the Lambda to be triggered by AWS EventBridge. This is like a cron job, waking up your Lambda using a timer. You’ll need to fill in your Tesla login credentials as Lambda environment variables, as below. This lets you avoid putting that in your code, where you might accidentally reveal it to others if you’re not careful. You also need to provide the name of your DynamoDB table, which is where you’re going to store the data about your Tesla.
DynamoDB is a cloud No-SQL database. It’s very economical, and lets you keep the project completely serverless, so the cost to run this is negligible. Go over to DynamoDB in the AWS console, and create a table. Because it’s a No-SQL database, you don’t even need to define all your columns ahead of time–just a key. I generated a unique ID for each record in my Lambda code, and used that as the key, but I probably could have just chosen the date/time stamp as the key. An important parameter to set in DynamoDB is the Provisioned read and write capacity units for your table. The default was 4 for each, but I just set these at 1 (for both). You can read up on what these numbers mean, but 1 is plenty for this application. AWS estimated that this table would cost me $0.59 per month with that read/write capacity. Below is a screen shot showing my DynamoDB table with some real readings from my car.
Now the only other thing you need to do is go into IAM in the AWS Console and make sure the role your Lambda is using has DynamoDB write access. When you create a Lambda you can assign your own role or let it create a default role for you. In this case, you can just take the default Lambda role and manually add the DynamoDBLambdaWritePolicy policy to it, and save it.
It works!
Once I went through the brain damage of understanding how to build a Lambda function with external Python libraries, everything worked great. I was conservative, and set the Lambda to wake up only once an hour. I didn’t try to wake up the car if it was sleeping, so that meant if the car wasn’t being actively used, there was no data returned. But I wanted to get some more readings, because in my 40 minute commute to work, I might get unlucky and get zero readings. So I changed the frequency to once every 30 minutes.
Uh oh
This worked for a few hours, until suddenly the Lambda started getting errors from the Tesla API. Then my Tesla iPhone app (which is also the key to the car) stopped working, and also gave me an API error. Uh oh. This made me a bit nervous. I wasn’t sure that if I contacted Tesla customer support and asked them to unlock my API access that they’d help me, or even know what I was asking them to do. I turned off the Lambda and luckily a few hours later, my credentials unlocked themselves and my smartphone app started working again. Maybe I just got unlucky, but I assume that Tesla locks out your credentials based on some unknown criteria, which I apparently triggered. So I think I’ll end this project on an up note, and leave the Lambda off.
P.S. One reader mentioned to me that there are commercial apps using the Tesla API, so in theory what I was doing here should have worked. His idea was that perhaps I should store the token received from Tesla and use it for subsequent API calls, and that perhaps asking for a new token each time I made an API call was what triggered Tesla to lock me out. It sounds plausible–perhaps they have a limit on the number of tokens they hand out.
I tailored my fastai model for bird (and squirrel) recognition to the situation in my backyard, so that I can use it to recognize birds that my Raspberry Pi HQ camera sees near my bird feeder. Fastai is a high-level Python library that sits on top of Pytorch. They’ve got an amazing set of videos that explain how to use it, so once you get up the learning curve, a model like mine can be written with just a few lines of Python.
I basically took the model I had previously trained on the whole Caltech-UCSD bird image dataset, but I removed all the training images for irrelevant birds that I don’t see in my backyard. Additionally, I spiked the data set with some images of squirrels and a couple of birds that I see in my backyard but which aren’t in the Caltech-UCSD data set (Hairy Woodpeckers and Black-capped Chickadees).
I think these are downy woodpeckers (plus a goldfinch)
You can see the Python notebook for my fastai model in Github:
Depending on the random seed, I can get over 95% accuracy with this model, so that’s close to the accuracy that Amazon Rekognition Custom Labels achieved (97%). However AWS took 1.4 hours to train the thing, because they are doing hyperparameter optimization which seems to require throwing a shitload of CPU at the model, and training it many times in a row. By contrast, mine takes just a few minutes to run with a GPU. Amazon’s service does a nice job of letting someone train a real custom model, with limited ML expertise, but it costs about $4.00 per hour for inference (i.e., predictions). So it’s not really viable for home use, although I think it’s great for Enterprises that don’t have deep ML skills. I should be able to run my fastai model for much less. I might run this on a low-end AWS EC2 instance, but we’ll have to see how an instance without a GPU performs. (I assume an instance with a GPU will be too expensive). Apparently you can also deploy fastai on AWS Lambda, so that might be the way to go.
A (likely) big problem, though, is that I doubt the accuracy of this model is really going to be 95%. The Caltech-UCSD people warn you right on their web site that these images may have been used to to train models such as Resnet. I’m using transfer learning, starting with Resnet. If Resnet’s already seen some of these images, testing your model with these images is probably going to give you an inflated idea of how good it really is. This looks to be the case: When I use this model with real images from my bird feeder, the results are worse than 95%. I don’t have a handle on the accuracy yet, but it’s definitely not 95%. Some of this is no doubt because my images are sometimes not in focus, or the bird may not always be oriented perfectly, whereas the data set images are generally of good quality. But some of this may be simply that my model just doesn’t have the capability to give you 95% accuracy on images it’s never seen before, and 95% is an unrealistic number because Resnet had a peek at some of the data set images previously. So I think I’d be better off training my model using actual images from my bird feeder cam, and not from an image data set. It will take me some effort to build up that data set, but that may be necessary to get the best possible accuracy in the real world. So the lesson here is that working with a canned data set won’t necessarily translate into real-world accuracy.
I’m trying to improve on my ML-based bird recognition results. Currently, a Raspberry Pi with a camera detects motion at the feeder, and sends pictures to the AWS Rekognition service, which I’m using to try to identify the species of bird. But I’d like to improve on the accuracy of AWS Rekognition, while keeping the cost down. So here, I’m using fastai, which is a high-level Python library, which runs on top of Pytorch. So far, I’m getting over 80% accuracy on the 200-bird Caltech-UCSD bird image dataset. You can check out my model on Kaggle, here:
Note that (as I describe in the next post), a big issue here is that I used transfer learning, starting with the Resnet model. Apparently Resnet’s already seen some of these images, so my 80%+ accuracy is probably an overestimate.
Previously, I wrote about how to use AWS Rekognition to distinguish between different varieties of birds. You can train AWS Rekognition Custom Labels with photos of birds that live in your area, or try to get by with the cheaper standard Rekognition service, although it will give you a less specific bird ID. Recently I extended this work to add a motion sensing camera using a Raspberry Pi 4 and the Raspberry Pi High Quality Camera. I also changed the architecture of the AWS portion of the solution to use AWS Lambda, S3 and SNS.
As shown in the diagram below, the Raspberry Pi sends pictures from my bird feeder to an S3 bucket at AWS. When a new image arrives in S3, this invokes a Python Lambda function that sends the photo to AWS Rekognition, which uses its ML-based image recognition capabilities to determine what’s in the photo. If a bird is detected, this triggers a message to an SNS topic, which you can use to get a text or email. If a squirrel is detected, a message is sent to a different SNS topic. So you might use texts to notify yourself of a squirrel sighting so you can go chase it away, and use email to notify yourself about interesting birds. Or you could even hook up the Raspberry Pi to shoot water at any squirrels invading the bird feeder (which might be a project for next summer). Eventually I added a simple web site built using the AWS S3 static web site approach, to allow easy viewing of the best pictures.
Raspberry Pi Motion Detection
A Raspberry Pi is just a very small Linux box with an ARM processor. There’s a package called PI-TIMOLO which I found to be very useful. You can run it on the Raspberry Pi to detect motion, and automatically snap a photo. You don’t need an infrared motion detector attached to the Raspberry Pi (although that might not be a bad idea). PI-TIMOLO scans a low-res stream from your camera, and if it detects a significant difference from one frame to the next, it concludes something has moved, and momentarily stops the stream, snaps a high-res picture and puts it in a folder.
I pointed a Raspberry Pi High Quality (HQ) camera with a cheap telephoto lens at my bird feeder and set up PI-TIMOLO. There are several PI-TIMOLO settings that you need fiddle with to get good results for your particular situation, but you can ignore a lot of the settings, such as those related to video, and panoramic photos. Just focus on the image and motion settings. I’ll put a sample of the PI-TIMOLO settings I used in my Github repo.
I have a small Python program running on the Raspberry Pi, which trolls the directory where PI-TIMOLO puts its photos. If my code senses a new photo in that folder, it crops the photo (as I’ll explain in a minute) and makes an API call to send it to an S3 bucket in AWS. Here’s the code:
For this this code to work, you need to install boto (the AWS Python SDK) on your Raspberry Pi, and also create an IAM user in AWS with rights to write to S3. You need to copy and paste the AWS user credentials from that IAM user into a credentials file in your .aws or .boto folder on the Raspberry Pi, so that your Python code has the credentials needed to put files into an S3 bucket.
AWS S3, Lambda, Rekognition, and SNS
Once that’s working, you create a Lamdba function in AWS. Lambda is the flagship AWS serverless computing service. A Lambda is a piece of code that will run once it’s invoked by some trigger, which could be an incoming API call, or a timer, or in my case, something arriving in an S3 bucket. Once it’s done its job, the Lambda terminates. It’s nice for my ML-based bird and squirrel detector because it lets me run the application without running a single server, so it’s very economical. Between AWS S3, Lambda, Rekognition and SNS, and the S3 static web site, I’ve got all of this great functionality, with state-of-the-art image recognition, cloud storage, and email and text notifications, and it’s practically free if I can settle for the standard Rekognition service (i.e., not Custom Labels–more on that later). Just make sure your Raspberry Pi doesn’t go crazy sending too many photos to S3, e.g., if your motion detection settings are too loose, because eventually too many API calls could add up. But if the camera takes about 200 pictures a day, the costs to run this are minimal because the AWS free tier gives you 5,000 Rekognition calls per month.
To create a Lambda, first, you need to create a role that the Lambda will assume, with rights to S3, Lambda, Rekognition, and SNS. Go to IAM in the AWS console, and create a new role and give it the following policies:
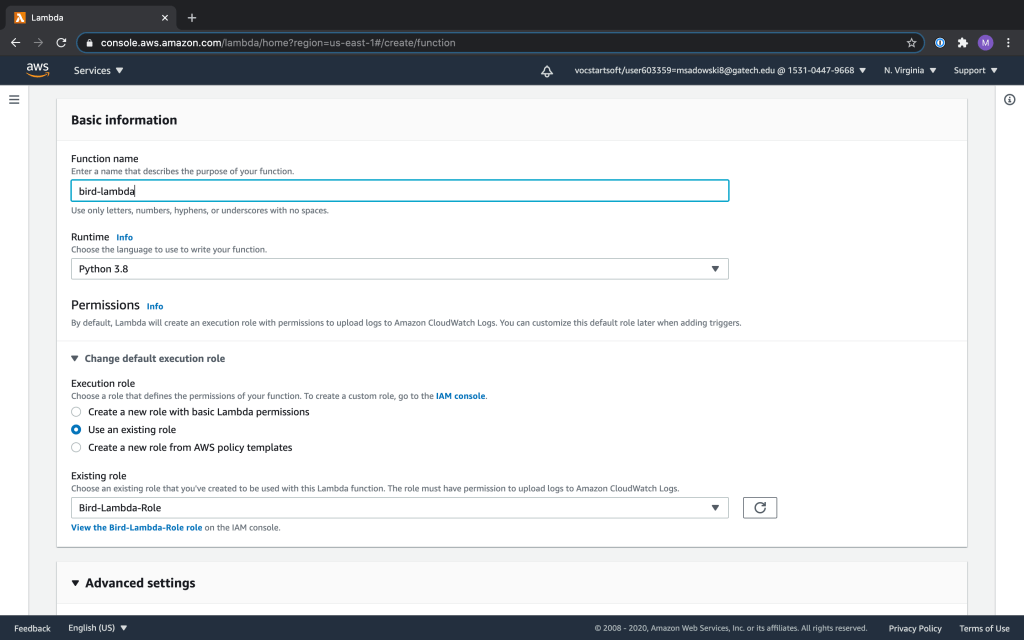
Then go to Lambda in the AWS console. Click Create Function, and choose Author From Scratch. Name your Lambda, and choose Python 3.8 as your language, and be sure to give it the role you created earlier so it can access S3, Rekognition, and SNS.
Having created the Lambda, you want to set it to trigger based on a new object being created in S3 (i.e., a new photo being sent from the Raspberry Pi). So you click the Trigger button and select the S3 bucket and folder (which AWS also calls a prefix) where your pictures will be sent from the Raspberry Pi. Then, it’s time to enter your Python code. Here’s mine, but you’ll need to enter your own SNS topic identifiers:
After waking up (upon the arrival of a new picture in S3), the Lambda calls the Rekognition API to see what’s in the photo. Rekognition is an AWS image recognition service. I described Rekognition in a prior blog post. In short, if you provide Rekognition with an image, it tells you what it thinks is in it. I found that Rekognition’s out-of-the-box training enabled it to recognize birds, and it could sometimes identify the correct species of bird. It can also identify squirrels, which are frequent pests around feeders. In the code above, I’m using the standard Rekognition service, which comes pre-trained to recognize common objects, animals, and celebrities (in case someone famous shows up around my bird feeder).
So anyway, my Lambda code calls the Rekognition API and looks at the response to see if Rekognition sees a bird or a squirrel. I created two AWS Simple Notification Service (SNS) topics with the AWS console: one for bird sightings and one for squirrel sightings. So depending on what Rekognition saw in the image, my Lambda posts a message to the appropriate SNS topic using the SNS API. You can subscribe to an SNS topic with email or SMS texts, and get notified of the type of bird that Rekognition sees, and also get notified of squirrel sightings.
Challenges
Configuring the Raspberry Pi to have the correct PI-TIMOLO and camera settings took some time. You want PI-TIMOLO to be sensitive enough to trigger a photo when it detects a bird, but not so sensitive that a few leaves blowing in the wind triggers a photo.
This was the first time I developed a Lambda function. I had prototyped and tested most of the code on my Mac, but it was a bit difficult to debug when I was creating the Lambda code in the AWS Console because I was debugging it by looking in AWS Cloudwatch to see what happened. Typically, there is a lag of up to five minutes before you can check Cloudwatch to see if you got any errors. AWS has a tool for debugging Lambdas locally (called SAM) so that’s probably worth learning if you’re going to create complex Lambdas, but I managed to muscle through without it this time.
Results
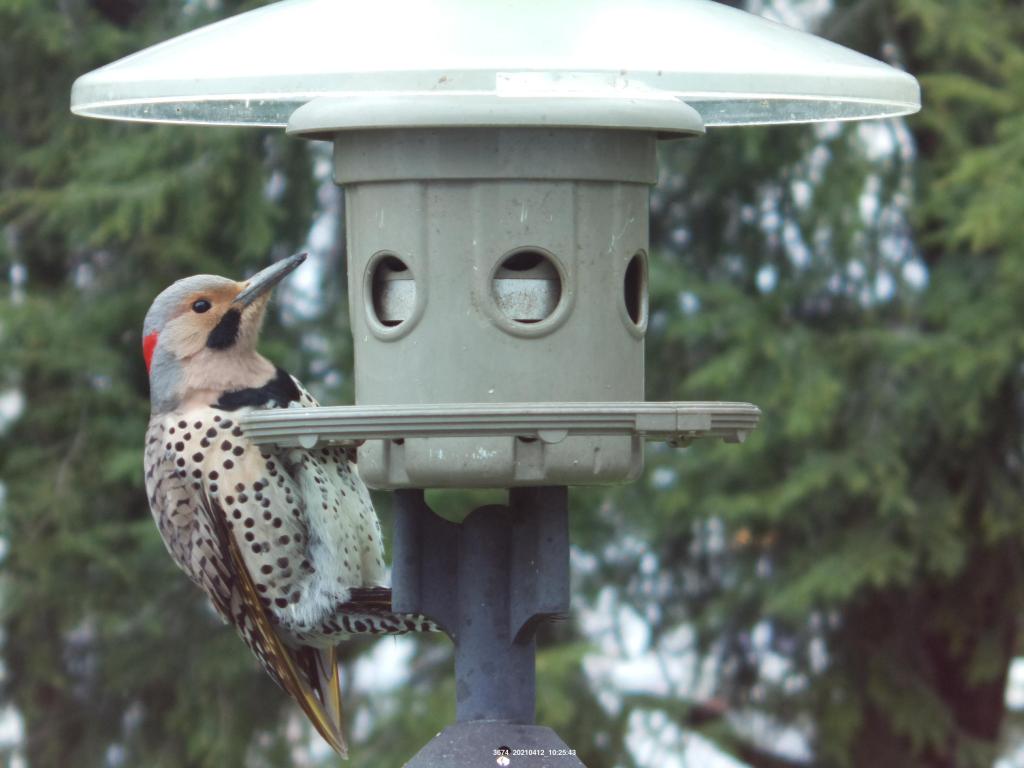
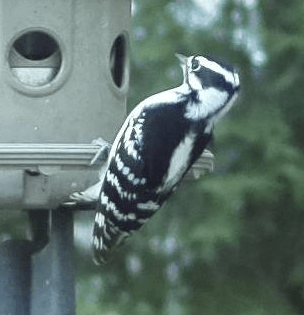
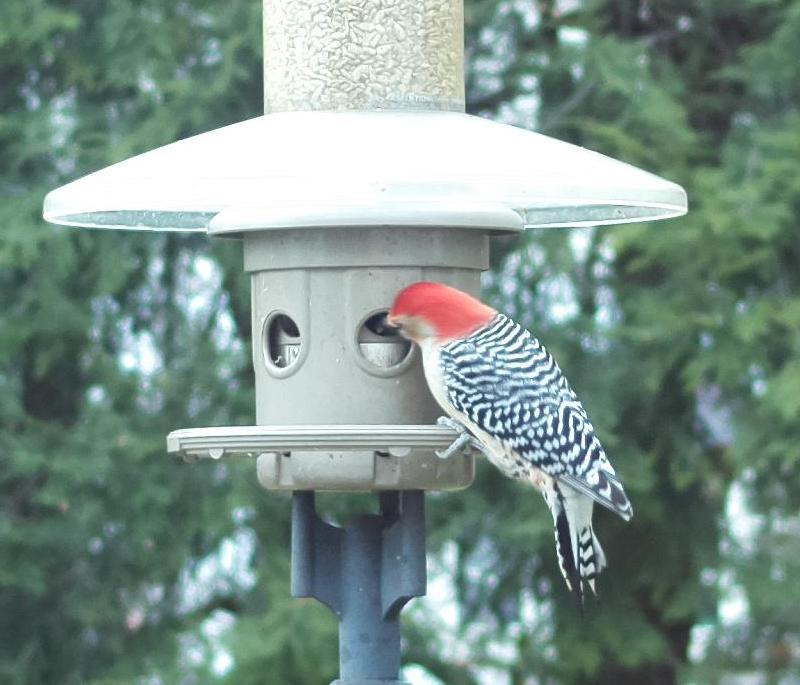
Using the out-of-the-box Rekognition service, I was soon getting many notifications telling me that there was a bird feeder in the picture, or lawn furniture. So it was easy enough to filter those out. Then it started telling me there was grass or “nature” in every picture, so I had to filter that out. Eventually, I found that Rekognition was identifying the fact that there was a bird in the picture, but it couldn’t identify the species. The problem was my image quality. Previously when I provided Rekognition with professional quality bird photos, it could often ID the species. But my photos just weren’t as good. I found that by cropping the photos so that the bird took up a higher portion of the image, Rekognition tended to focus more on the bird and could sometimes recognize the bird species. So I added some cropping logic to my Raspberry Pi code, using the Python Pillow library. After cropping a woodpecker image (below) from my Raspberry Pi camera and sending it to Rekognition, I got this notification from SNS:
Detected labels for photo at time 2020-11-22-18:34:11
Bird (Confidence 99.25276184082031)
Flicker Bird (Confidence 78.45641326904297)
Woodpecker (Confidence 78.45641326904297)
Finch (Confidence 54.26727294921875)
in photo new-bird-images/2020-11-22-13-34-09.jpg
Poultry?
It’s a red bellied woodpecker, so Rekognition did determine it was a woodpecker (with moderate confidence), although not a red bellied one. It also thought it might be a flicker bird (and a finch, with low confidence). That’s wrong, although when I looked up flickers on the Cornell Ornithology site, it turns out they are a type of woodpecker, so this answer isn’t completely off-base. Rekognition sometimes gives some odd results, however. For example, the photo on the left was labeled “poultry” by Rekognition. Perhaps it looks a bit like a small chicken? Another time Rekognition decided that a photo from my backyard had a penguin in it. I checked and it was indeed a photo of a black and white bird. Of course, ML image recognition models only know about training images they were previously provided. They don’t have an understanding of the context of the images, which would let them know that it’s ridiculous to report that there’s a penguin in my backyard.
Rekognition Custom Labels
To get really accurate results, you can consider training Rekognition Custom Labels (or some other ML-based approach that involves custom training). Following the approach in my prior post, I used images from the Caltech-UCSD bird image data set to train Rekognition on common birds in my region. I threw in some pictures of squirrels so that Rekognition could also identify them. It took about 1.4 hours to train the model, but the results were impressive (although I found I was able to come close with a fast.ai model that I wrote with a few lines of Python). Below, you can see how Rekognition Custom Labels performs on the test images for various bird species that live in the Northeast (and squirrels)–it’s almost never wrong (at least when using professional quality pictures)!
But while this ML service does an outstanding job, it’s too expensive for an individual hobbyist to leave running all day long. You get a few hours as part of the AWS free tier, but after that it’s $4.00 per hour. Luckily I was able to get $100 in free AWS credits in my account, so I could try it for free. To economize, AWS recommends starting the service up, using it, and taking it down when you’re done. So you can’t really run it for hours and hours, which was my original design. For an enterprise, however, this service would be well worth the price, and it’s really not that expensive compared to other options.
To use Rekognition Custom Labels, you need to change your Lambda function slightly to use the detect_custom_labels API call rather than the detect_labels call. Then, start up the model (you can use the AWS CLI for this). If you click on your model in the console once training has been completed and scroll to the bottom, AWS provides you with the CLI command and you can just cut and paste it into a terminal window. Wait several minutes, and eventually the AWS Console will tell you it’s running. Just make sure you stop the model when you’re done so you don’t continue to rack up charges.
When I tried Rekognition Custom Labels with pictures taken by my Raspberry Pi camera, initially I found that Rekognition Custom Labels wasn’t recognizing anything. But when I cropped the images Rekognition correctly determined that the picture (above) was a red bellied woodpecker. That was very cool, although I learned some tough lessons about training a model when I sent about 1200 pictures to Rekognition Custom Labels. The bird IDs were often wrong because the model had been trained on images it was unlikely to see at my feeder (e.g., blue jays aren’t common around here this time of year, but it thought it saw a lot of blue jays). Additionally, my images were sometimes out of focus because the bird was moving. So if I was going to run this model all the time, I’d retrain it with pictures that are closer to what it would see in production–ones from my feeder rather than stock images from a data set.
Given the cost of Rekognition Custom Labels, I’m probably just going to just run this with the much cheaper, off-the-shelf Rekognition for a while, and consider moving to a cheaper custom model in the future.