I recently appeared on a Webinar with Box, where I discussed their new Box AI Agents functionality. I’m not sure how long this link will be up, but you can check it out here.
E-mail Q&A Automation using Box AI and Power Automate
Here’s a blog post I contributed to the Box Developer Blog. It explains how you can use Box AI and Microsoft Power Automate to automate email replies to your customers’ FAQs. It’s easy to do and quite powerful!

Introduction
Does your business have customers that contact you by e-mail with routine questions? Are many of these questions repetitive and routine? In the Commercial Real Estate business, tenants of large properties typically e-mail questions to a building management team, who answers these using a shared e-mail box. Sample questions might be “where can I park my bike?”, or “what are the rules for contractors while on site?” We’d like to automate the answering of routine, repetitive questions, while focusing team-member efforts on answering the more difficult, non-routine questions.
Solution Overview
In this blog post, I’ll show how you can create a Power Automate cloud flow that receives e-mails, calls the Box AI API to generate automated answers to common questions, and replies by e-mail to customers who originated the questions.
Details
To get started, we need one or more Frequently Asked Questions (FAQ) documents. These should contain the top questions we get from our customers, as well as the answers. We’ll put these into a Box hub (a collection of content) in Box. We need to note the Box ID of the hub, since we’ll need that later for the Box AI API calls in our Power Automate flow. You can get the Box hub ID from the URL in your browser when you view a hub in Box.
Figure 1 shows an overview of the Microsoft Power Automate flow that manages this process. First, we receive an e-mail into a specific Office 365 e-mail box. You might want to create a special e-mail box for questions from your customers so it’s clear that every e-mail to that account is a question to be answered. Receiving an e-mail triggers our Power Automate flow.
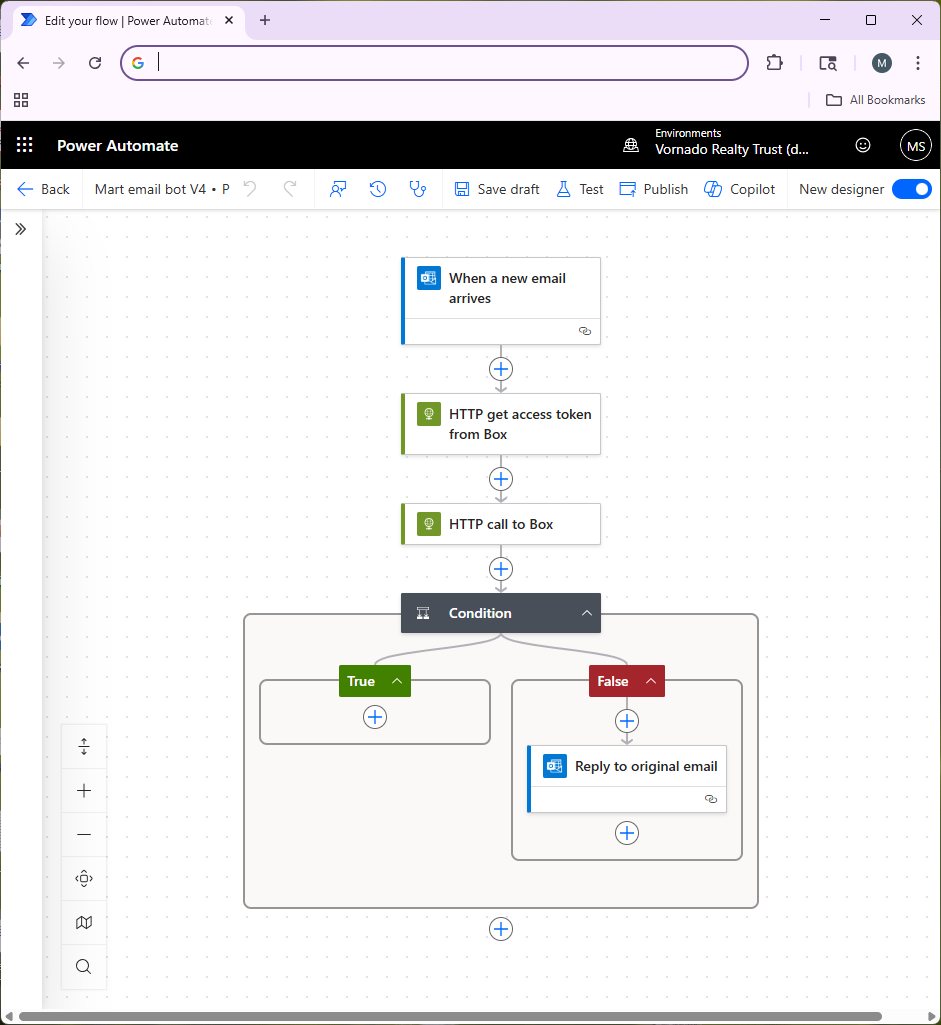
Next, our Power Automate flow makes an API call to authenticate to the Box API (the step called “HTTP get access token from Box”). Ahead of time, you should use the Box Developer Console to set up a Box Platform App (using Client Credentials Authentication) and get that approved by your Box Administrator. This lets you create credentials for the Box API, which we store as environment variables in Power Automate. Ensure that you go into the Box web UI and collaborate the hub containing your FAQ documents with the service account for your Platform App so that it has access to the content in the hub. This is important — you will get errors from the Box API if your Box Platform App doesn’t have access to your hub.
In the next step in the flow (“HTTP call to Box”), we take the user’s question from their e-mail and send it to the Box AI API. Figure 2 shows how to do that in more detail.
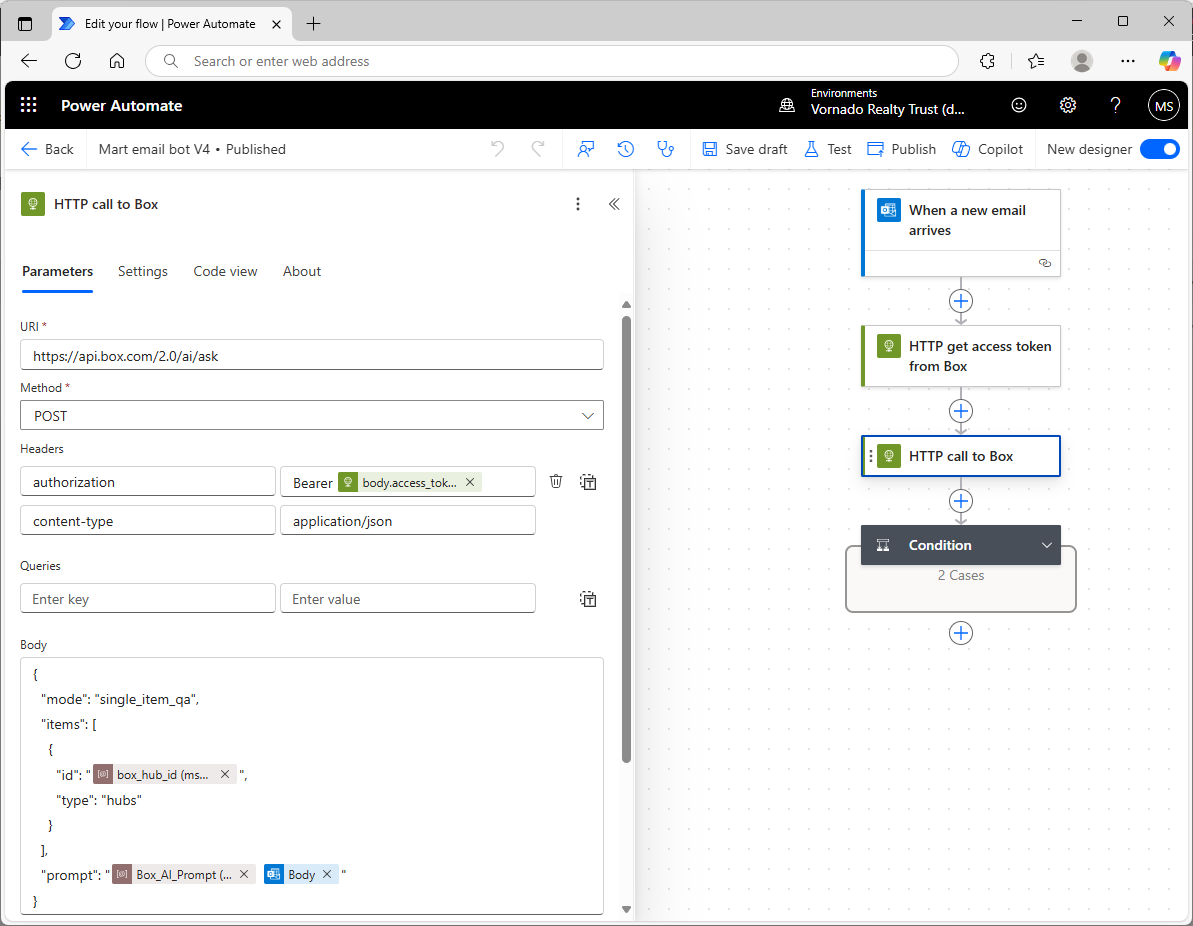
Power Automate has a standard action for making an HTTPS call. Using that, we’ll make a POST to the Box AI API, providing the token we got back from Box in the earlier authentication step, and the Box ID of our hub. We’ll also provide a prompt to Box AI. The prompt contains two parts:
- the contents of a Power Automate environment variable called Box_AI_Prompt (you’ll need to create that in your Power Automate solution), which provides instructions to Box AI regarding what it should do (i.e., create an e-mail reply to an e-mail we receive from our customer, be concise, etc.), and
- the question that the user asked in their e-mail (the e-mail body). This might include some HTML formatting, so the prompt can tell Box AI to ignore that.
Box AI tries to find the answer in the FAQ documents and sends it back in the Box API response. We don’t want any hallucinations, or use of general knowledge the LLM may have picked up in it’s training. So if the answer’s not in the document in Box, our prompt instructs Box AI to simply reply “I don’t know” and nothing further. You will probably need to experiment with your prompt to get the results you want.
Next, we have a Power Automate “condition” step. This is how we implement if-then statements in Power Automate. This step checks whether Box AI replied “I don’t know.” If Box AI didn’t say “I don’t know” then it means it was able to come up with a good answer using the FAQ content in the hub, so Power Automate will send an e-mail reply to the user that sent the original question. If Box AI did reply “I don’t know”, then we don’t send any e-mail reply at all. In that case we’re leaving this question to the people monitoring the e-mail box, and the AI e-mail bot gets out of the way.
Some Advice, and Next Steps
Left to its own devices, Box AI might add superfluous content to the e-mails it generates, such as salutations (“Dear John:”), or it might add a signature to the e-mail. You’ll learn this when you test your bot. In order to ensure you have full control over the content of your replies, it’s best to tell Box AI to suppress this kind of content (do that by giving very clear instructions in your prompt) and just provide the answers directly based only on content in the hub. Then you can wrap the Box API response (in the Power Automate e-mail reply step) with your own signatures, logos, etc.
In the future, it will probably worth trying some of Box’s newer AI functionality. Box AI Studio lets you give the AI agent some additional background, or a kind of “persona.” It also lets you select different LLMs, so it’s probably worth testing these to find out which ones provide the best results for your situation.
AI Chatbot to Control Spotify!

Large Language Models (LLMs) have an amazing ability to generate text based on a user’s prompt. But can we use LLMs to actually control a real world “thing?” Or are they really just useful for generating text?
It turns out that using an LLM to control something in the real world is quite doable now. Using OpenAI’s tools functions, we can give an LLM like OpenAI enough knowledge to let it choose an external API to call, based on the situation at hand. We “force” OpenAI to select an API call, rather than just blather on using unstructured text, like it ordinarily does. The API could be used to control another software application, or it could even control a physical object like a robot.
So, for example, what if a user is trying to brainstorm a list of songs, and use it to create a Spotify playlist? OpenAI should help us take that list of songs and feed it to the Spotify API that creates a playlist. Or if the user wants to start playing a certain album, the LLM should help us call the Spotify API to play the album by giving us the exact Spotify API call to make, and the specific parameters to use (e.g., album name, artist). Then our software can do the rest, by making the appropriate API call.
Current Functionality
My chatbot includes the following functionality:
- Have a conversation about music that (hopefully) results in some suggested tracks. The user can then ask the bot to add the tracks to their Spotify queue or a playlist
- List your current Spotify playlists
- Create a new Spotify playlist based on some tracks, or add tracks to an existing playlist
- List the tracks within a playlist, or on an album
- Add tracks to the queue
- Start to play a specific album, song, or playlist
- List the top tracks for an artist (according to Spotify)
- Pause play
- Start playing again
How it Works
Streamlit provides a basic framework for a web chatbot. Once the user types their prompt into the chatbot, we send it to OpenAI’s API. However, a key thing we do in our API call to OpenAI is to utilize OpenAI’s “tools” capabilities. Our tools.py file (see Github) explains to OpenAI all of the API functions we want it to consider when responding to the user’s prompt. This biases OpenAI towards providing us with an API call, rather than just some text. If OpenAI responds with a “tools” call we run some code that helps us call the corresponding Spotify API, interpret the result, and display it to the user in the chatbot. So, for example, if the user is conversing with the chatbot about Bowie’s top songs, the user might ask the bot to create a playlist using those tracks. OpenAI will realize that we should use the Spotify API call to create a new playlist, and feed in those Bowie tracks as parameters. Then, Spotify will create the new playlist. So we’ve taken a conversation about music with a chatbot, and turned it into a real-world action–creating a Spotify playlist in your Spotify account.
Steps to Set Up the Chatbot
You’ll want to modify the code to your preferences. But to get started, follow these steps:
1. Create an “App” in the Spotify Console
First, create a Spotify App in the Spotify Developer Console. You can see how to do that here. You’ll get a couple of important items that you’ll need later: your Spotify Client ID and your Spotify Client Secret. I believe you may need to be a premium Spotify account holder to use the API.
2. Get an OpenAI API Key
Create an OpenAI developer account using their API console and get an API key. You’ll need to provide your credit card and put down some money, but the costs for LLM services have been dropping like a rock lately. So just put down a few dollars and keep an eye on your usage. We’ll use OpenAI’s 4o-mini model, which is a great value. It’s much less expensive than their prior models, and seems to work very well for applications like ours. And it’s quite fast.
3. Install the Python Libraries
My code is in Github. The key libraries you’ll need to install are:
- spotipy: A Python SDK for the Spotify API
- openai: Python SDK for using OpenAI
- streamlit: A basic web server tool that we’ll use to build the chatbot
4. Download the Github Files
Download the files from my Github repo to your local machine. You can also use a server, but it’s best to get it working locally first. That will be enough to control your own Spotify player, although you’d need to deploy it on a server to make it available to others.
5. Edit the Config File
Edit the following values in the config.toml file:
- client_id: This is the Spotify API Client ID you got from the Spotify API Console
- client_secret: This is the Spotify API Client Secret, also from Spotify’s Console
- redirect_uri: A URL to your application that Spotify will invoke as part of the authentication process. If this is your local workstation/PC, then you can use http://127.0.0.1:8501. If this is a server, use the IP of the server with the 8501 port. 8501 is the port used by Streamlit to receive incoming requests. You also need to enter this URL in the Spotify API console as a redirect URI for your Spotify “App.” It should be EXACTLY the same as in the config file. The reason you need to enter your URL in the Spotify console is that Spotify wants to ensure (for security reasons) that the authentication process redirects only to machines that the app developer (i.e., you) knows about, so nobody can hijack your app.
6. Create an Environment Variable for the OpenAI API Key
On Linux or a Mac, go to the command line and use a statement like this (you can look up how to do this in Windows, if needed):
export OPENAI_API_KEY=<Your OpenAI Key goes here>7. Run the Streamlit application
Streamlit is a Python framework for creating basic web applications and chatbots. The main file for our app is spotify.py. Additionally, tools.py and utils.py are used by the main file, as is the config file: config.toml. Start up the web site by cd’ing to the directory that holds the program files and typing (from the command line):
streamlit run spotify.pyIf all goes well, Streamlit will tell you that you can fire up your chatbot in a browser with a URL like http://localhost:8501 (for a local Mac or PC installation), or http://xx.xx.xx.xx:8501 for a server-based installation, where xx.xx.xx.xx is the IP address of the server. The most common issues you might encounter will be failure to enter the correct parameters in the config.toml file or to create the correct OpenAI key as an environment variable, or failure to correctly enter the redirect URI in the Spotify API console.
8. Spotify Authentication
When a user hits the Streamlit web site, they must authenticate with Spotify in order to let the web app access the user’s Spotify data, and have the ability to take action on behalf of the user. Once the user pulls up the Streamlit web site, they’ll see a screen like this:

The user should click the Log In to Spotify button, and this starts the authentication process. The user will be normally be taken to a Spotify web page where they must enter their password or enter a code sent to their email address. They must accept the “scope” of our application, which means they accept that the app can see certain data, and modify it. Each user authenticates separately. The cool thing about this is that the application can access their personal Spotify playlists, and create new playlists on their behalf, etc. The app requires the user to authenticate each time they use the app because we don’t keep their Oauth2 token and authorization code around on the server, and because the token that Spotify provides our app is valid only for a limited time (about an hour).
Authentication is the trickiest part of the project. You might need to fiddle with this a while. If you leave out a step, or if the redirect URI that you entered in the config.toml file doesn’t match EXACTLY the redirect URI’s you entered in the Spotify API console for your Spotify App, it won’t work.
I tried to fire this up in the cloud using Amazon Lightsail Containers, but I believe the load balancer that’s in front of the AWS container was mucking things up, and I wasn’t able to authenticate to Spotify. I was more successful with Amazon Lightsail Instances, and got this working in a short time. There’s no load balancer in front of the instance unless you explicitly put one there, so that seems to simplify things. A Linux Lightsail instance (i.e., virtual server) that’s sufficient for this project costs only $7-$12/month, and they sometimes offer free trials (I got 90 days free).
9. Using the Spotify Chatbot!
Once you get this working, you’ll probably want to modify it to suit your needs. A few words of wisdom:
- Modify the prompts and tools functions based on the results you’re getting. If you find that you would have expected OpenAI to make a certain tools call, after the user enters certain user prompts, and that doesn’t happen, then experiment with the prompts and tools definitions. Make if very clear to OpenAI what function call to use in various circumstances, if it’s not doing that. Look in the tools.py file to see how I handled it.
- Error handling can be tricky with the Spotify API – I’ve tried to handle typical errors that might crop up, but sometimes you might find that I assumed a certain format for the Spotify API response, and that didn’t occur. So you can certainly improve upon this.
- You DO need to have the Spotify app installed and fired up on whatever device you are using this on. So if you’re running this on a web browser on your Mac, ensure you have the Spotify Mac app installed and running on your Mac.
- I’ve primarily tested this on a Mac. In theory it should work on other devices but I found that it didn’t work quite as well on an iPhone (it seemed like the user got kicked out after a short time and had to keep reauthenticating). So getting this working smoothly on other devices would require some additional work.
- Certain Spotify API functions will only work if you have the Spotify app running and a song is playing. e.g., you can’t pause playback if the app isn’t playing.
Text2SQL Chatbot for querying databases using ordinary English

This project shows how you can build a chatbot that can query a data set stored in a database using ordinary English. The chatbot translates your questions into SQL, the database’s language, and queries the database to find the answer to your question. You certainly have many databases in your company that aren’t easily accessible unless you can write SQL queries. Tools like this one can open up that knowledge to many more people.
ChatGPT and other chatbots based on LLMs have been trained on general knowledge using content such as the Internet and various news sources. But they don’t know about data that’s locked away in databases.
I had previously worked on a text to SQL project using LLMs. It’s actually not that difficult to make a demo of text to SQL using an LLM, but actually getting useful results (e.g., > 90% accurate queries generated by the LLM) turns out to be quite difficult. So I was interested to see if some new innovations in LLMs might make text to SQL more achievable. OpenAI has a feature called Functions that looked interesting.
To start out, I made a SQLite database using the fairly well-known Lahman baseball database. I downloaded the CSV files and made a .db file out of them using DB Browser for SQLite.
Next I “borrowed” some code from OpenAI’s API cookbook, where they show you how to use OpenAI’s Functions feature. This lets you force the output of OpenAI API calls to make them comply with the syntax of some outside function. This could be an API, or in my case, SQL that we want to execute against the baseball database. It’s your problem (as the programmer) to make the API call or execute the SQL query–OpenAI doesn’t do it for you–but OpenAI generates output that you can feed into your function call, and you take it and use it.
Next, I wrapped all of this in a basic chatbot built using Streamlit. I didn’t bother retaining the context of the conversation using a tool like Langchain, since my intention here was to focus on SQL generation. So if you try this out, and you’re not happy with the results of a query, you’ll want to try to rephrase your question more clearly for the chatbot. Some phrasings work better than others.
If you go to the ChatGPT web site and ask it to generate SQL for use with the Lahman database, it will actually generate some sensible looking SQL based on its training. It’s obviously aware of the Lahman database. However if you actually try to execute the SQL, it often won’t work because ChatGPT makes bad assumptions about the various fields and tables. So you need to improve on that by giving the OpenAI API information about the actual tables and fields in the database, as well as some sample queries and correct answers. I came up with about 20 of these, but you’d probably need many more to ensure a high fraction of correct answers. My chatbot seems pretty good at simple questions, and can even do well on some more difficult questions that would require a few SQL joins. To improve on this I’d need to add more and more examples. Every time I got some bad SQL, I found that giving the LLM an example with the correct answer helped get better results next time.
So in the prompt that you feed the LLM, you have 3 main things:
- The user’s input (a question about baseball statistics)
- Background on the structure of the database–I used Lahman’s documentation to provide the LLM with a description of all of the tables and fields
- Example questions that show OpenAI how to construct correct SQL for various user inputs
The output of the LLM will be a query which is the LLM’s best attempt to generate SQL that will answer the question the user asked. Next, my code queries the database, and shows the answer. It looks something like this:

I’ve deployed this project as a container using Amazon Lightsail. If you’d like to try the baseball text2sql chatbot, click here. You can also look at my code in Github.
Extending ChatGPT’s “memory” with info beyond 2021
Is the Queen dead? ChatGPT has no clue. I’ll fix that using the OpenAI API, Amazon Lex, and the Wikipedia API
If you’ve used OpenAI’s ChatGPT you’ve no doubt noticed that it doesn’t know about events post-2021 because the training data used to train it was last updated in 2021. So if you ask it if the Queen is dead, ChatGPT will say “…as of my last knowledge update in September 2021, Queen Elizabeth II of the United Kingdom was alive.” Of course the Queen died in September 2022.
How can we use ChatGPT while incorporating more recent events? One idea is to augment it by calling out to other information sources that are more up-to-date. You could use news sources, for example. Actually, the OpenAI API now provides some interesting capabilities here, e.g., you could use ChatGPT to formulate a query to an external database based on the question you’re asking.
I built a chat bot using Amazon Lex, the OpenAI API, and the Python Wikipedia API library to allow you to get succinct answers on more recent events. I wrote a custom AWS Lambda in Python to tie all of this together. I started with some Python code from an AWS tutorial for a Lex chatbot for an online banking use case, but made a fair number of changes to it. The tutorial code was helpful in understanding the JSON format that Amazon Lex wants you to provide in order to interpret your responses (e.g., to provide Lex with OpenAI’s answers). You can see my Lambda function in Github. You’ll need to include your OpenAI API key in a Lambda environment variable if you want to use this. One slightly tricky thing is ensuring that Lambda environment has access to the OpenAI and Wikipedia API Python libraries. You need to zip those up with your Lambda code in a specific way, and upload the whole zip file to AWS via the Lambda console. It’s described well in this blog post.
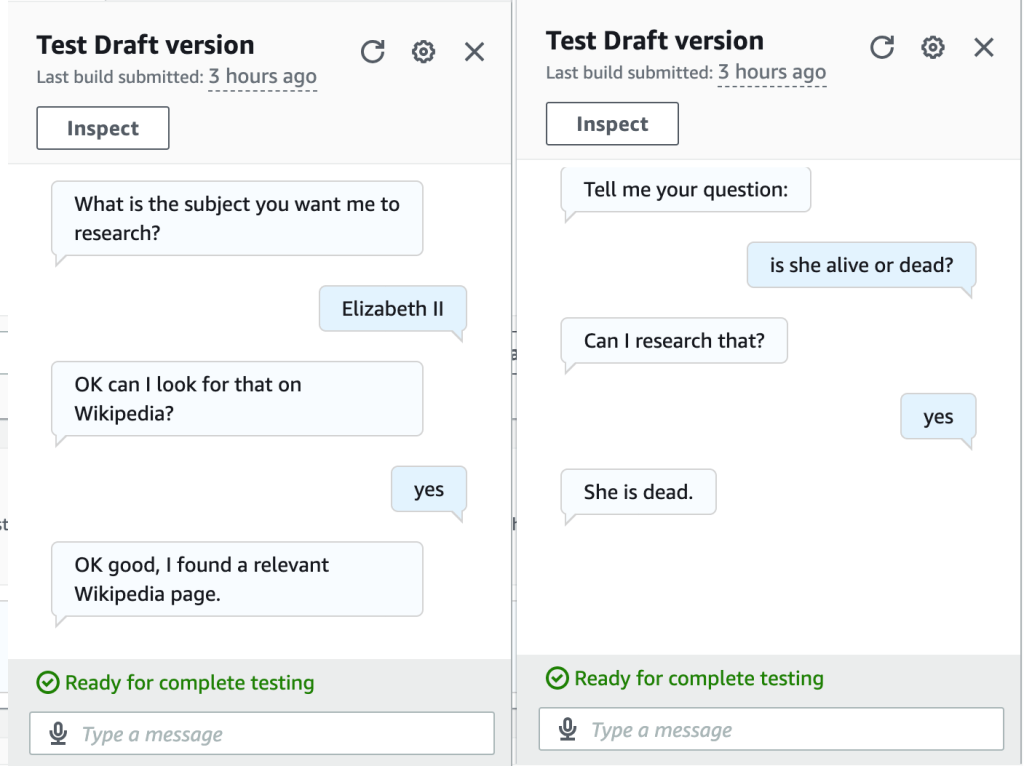
Amazon Lex manages the user’s chat session. You can learn how to use it with a tutorial from AWS, so I’m not going to repeat that here. My Lex chatbot has just two “intents” (sections of the chat workflow): the first is to get the user’s input on the subject they want to research. The second is to get the specific question that they want answered. Lex lets you make calls to an AWS Lambda function to provide custom functionality at specific points in your chat (e.g., the end of each “intent”). When the user has told the chat bot the subject they want to research, my Lambda function uses the wikipedia-api library to check if a relevant Wikipedia page exists. This seems to work pretty well for common subjects. So if you tell the bot that you want to research, for example, Andy Rourke, the Smiths bassist who (unfortunately) recently died, it will find a Wikipedia page en.wikipedia.org/wiki/Andy_Rourke.
Now, having found that a relevant Wikipedia page exists, Lex asks the user to provide their question. Again, Lex calls my Lambda function, which retrieves a summary of the Wikipedia page (we could use the whole Wikipedia page text, if needed, but all of that extra text would increase my OpenAI API bill substantially, so I just decided to use the Wikipedia page summary). Now, having retrieved the Wikipedia text on the subject, we call the OpenAI API and ask OpenAI the user’s question, while providing the Wikipedia text as part of the prompt given to OpenAI. This results in quite accurate responses, assuming Wikipedia covers the user’s question, which could be anything that Wikipedia entries typically include–birth and death dates of famous people is just one example.
So for the question of whether the Queen is alive or dead, the bot provides the correct result (see below), whereas ChatGPT thought the Queen was still alive.
Finally, check out Andy Rourke’s bass line in the iconic Smiths song, The Queen is Dead. Upon Andy’s recent death, Johnny Marr said “…when I sat next to him at the mixing desk watching him play his bass on the song The Queen Is Dead. It was so impressive that I said to myself I’ll never forget this moment.”
Updates to my NHL Hockey ML Model on Kaggle
Now that the 2022/23 NHL season is over, I’ve updated my model that predicts a team’s chances, based on the types of players on its roster. As I show on Kaggle, clearly some teams like the Stanley Cup champion Vegas Golden Knights are playing Money Puck (i.e., spending their cap dollars wisely on the players that contribute most to winning in the playoffs) while their competitors are playing a different game. Check it out on Kaggle.

Drake is asked about the Leafs’ chances after consulting my model on Kaggle.
ChatGPT API (and Amazon Lightsail)
I containerized my ChatGPT news app, and deployed it in Amazon Lightsail. I had this running for a couple of months but I took it down because it was costing a few dollars per month. This app takes a news feed and gives that to ChatGPT using their API, and also asks ChatGPT to provide a (hopefully) humorous sales pitch for a classic “advertised on TV” product, using the news story as inspiration. My idea was to test out the concept of using generative AI in, for instance, a business application that creates timely sales pitches.

You could direct ChatGPT to provide serious sales pitches, but I asked for funny ones. The result is something like the Onion, except it’s completely machine generated. For example, when an ET Online article described how Kim Kardashian sported a pink suit that made her look like a Power Ranger, my web site generated this story: “In a hilarious turn of events, Kim Kardashian recently moonlighted as a Pink Mighty Morphin Power Ranger at the launch of the Navage Nasal Irrigation System. Kardashian donned her pink suit and posed with Navage, a device that uses a gentle saline flush to cleanse your nasal passages and relieve congestion. With Navage, you can put the power of the Pink Ranger in your pocket and blast away your sinus problems!”
Amazon Lightsail is useful for small sites like this one. I was expecting to be able to export my container from Docker on my Mac into a file and upload it through the AWS Console to Lightsail. That’s not how it works, though. You need to start a container service in the AWS console and then use the AWS command line on your Mac or PC to extract the container image from Docker and push it to Lightsail, as AWS describes here. Once it’s up there you can start it from the console. It costs only $7 a month to run a container using the smallest (Nano) server.
I’ve updated the code in Github if you want to try it.
Using the ChatGPT API for Business (Wanna Buy a Ginsu Knife?)
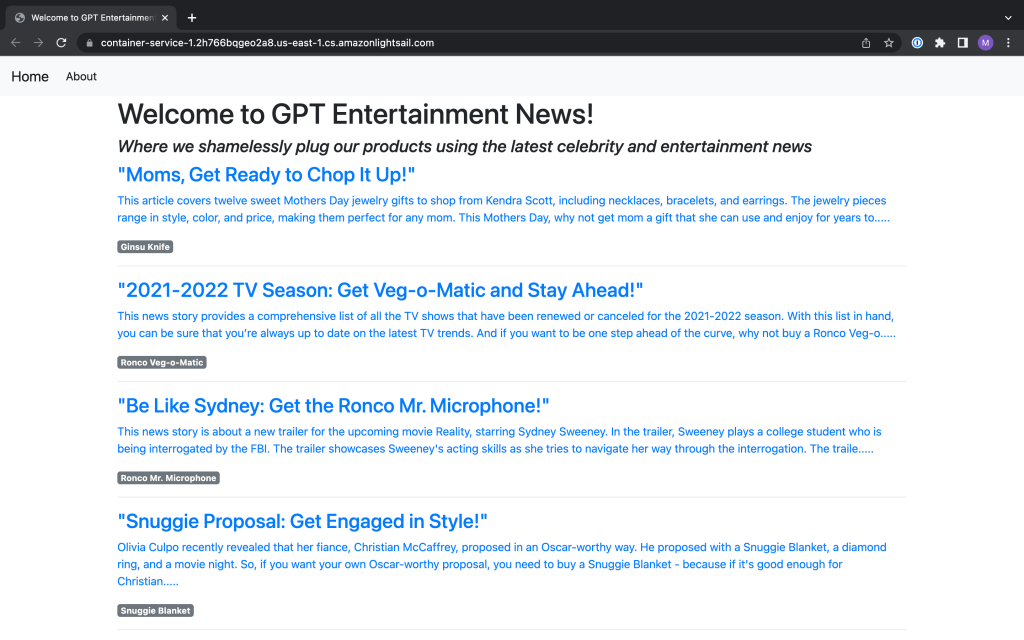
I made a small Flask web site that reads the latest news feed from CNN and uses the ChatGPT API to generate a (hopefully funny) sales pitch for a product
Most people have tried out the web interface to ChatGPT, and been impressed by its capabilities. But how might you use it in your business? There’s an API for ChatGPT so you can build this into any application you want. I tested it out by building a small Python Flask web site.
My idea was that you might want to use ChatGPT to generate topical sales pitches for your products. So I grabbed a news feed from CNN and picked a few classic humorous products, like the Ginsu Knife and the Fishin’ Magician, and tried to get ChatGPT to help me generate web site content. I used the news stories to build a prompt for ChatGPT, and asked it to summarize the stories and segue to a sales pitch for one of the products.
You can see my code in Github. I started with a Flask blogging tutorial on the Digital Ocean web site, and modified it as needed. The app consists of just one Python file, which reads the news feed and makes the calls to the ChatGPT API, plus some HTML files, and a CSS file (these were mostly unchanged from the tutorial app).
You can get idea of the results below.

Sometimes the content ChatGPT generated was hilarious, and other times it was a bit generic. At one point I got this one, which was pretty funny:
This news story discusses how President Donald Trump was indicted on two charges related to hush money payments made to adult film star Stormy Daniels. Trump is accused of breaking campaign finance laws by paying off Daniels in order to silence her about an alleged affair. Why should you buy the K-tel Fishin’ Magician? Because with this device, you can cast your line and catch a big fish like President Trump did with Stormy Daniels – without the legal consequences! Don’t get caught with your pants down – get the K-tel Fishin’ Magician and reel in the big one!
Of course this is just a fun example that I created, but as you can see, I’m using ChatGPT to generate topical content in a fully automated way, and this would (hopefully) be useful to a business that needs to tailor a sales pitch on the fly. You could imagine feeding in a person’s LinkedIn profile, or their company’s profile to obtain even more tailored text.
In the course of trying this out, I learned a few lessons:
- The API is quite expensive. OpenAPI gives you a trial, which contains $18 in credits. They only give you a couple of days to use them however. So I found myself signing in through other accounts so I could keep playing with it. I had hoped to deploy this on a web server so others could try it, but it looks like that could cost a fortune. I’m hoping Google Bard will cost less and perhaps I can switch to it.
- You pay by the token. OpenAI says that “you can think of tokens as pieces of words, where 1,000 tokens is about 750 words.” I was using the “Davinci” model, which costs 2 cents/1000 tokens. They have more expensive models, like ChatGPT4, which costs up to 12 cents per 1000 tokens. Since I was summarizing a lot of news stories, I found that by just testing my site I was blowing through a lot of tokens.
- I was surprised that the API didn’t behave like the Chatbot web site OpenAPI provides. It appears you need to keep reminding ChatGPT what it said previously. I was trying get ChatGPT to generate a headline for a previously generated news summary, but it kept generating headlines that seemed to be completely unrelated to the previously generated text. So I changed my code to take that text and feed it back to ChatGPT, and told it to consider that input and generate a short, headline-style summary. That worked much better. The only problem with that is it seems to consume more tokens because I believe you pay for both “prompts” (your input text) and the output text. So if you’re using the API to carry on a conversation it’s going to get more and more expensive the longer the conversation goes.
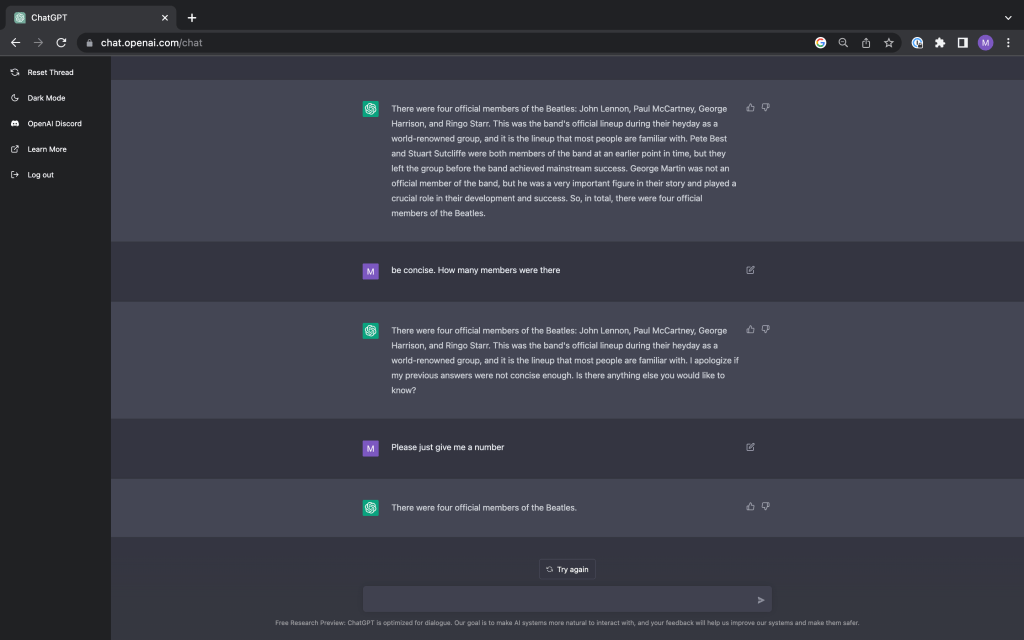
Talking about the Beatles with GPT-3

You may have seen some people having a laugh because they managed to get GPT-3 (a massive and well-hyped ML model that can generate human-like text) to tell them that the world’s fastest marine mammal is a sailfish. I assume that’s a problem with the training data, more so than the approach GPT-3’s inventors used. GPT-3 is trained from a huge “corpus” of text that resulted from crawling the web for eight years, plus a lot of books and Wikipedia. So sure, you can trip this thing up on some subjects because it’s only as smart as the Internet. GPT-3 doesn’t really have “knowledge” but rather it generates plausible text based on it’s training, your input and what it recently generated. So it’s not correct to say it’s “stupid” because it doesn’t know that a sailfish isn’t a mammal. This was just some plausible human-sounding text it generated based on those factors, so most likely there is something on the internet led GPT-3 to generate text implying a sailfish is a mammal. But anyway, I played around with GPT-3 and found it to be pretty mindblowing.
OpenAI just put out a Chatbot interface to GPT3 so it’s easy to try it for yourself. Check out this conversation I had with it. I tried to “trick” it by asking about how many members of the Beatles there were. Everyone knows there were 4 members: Paul, John, George, and Ringo. Except there weren’t. There was also Stuart Sutcliffe and Pete Best, who were early members who didn’t quite work out or had other interests. And what about their producer, George Martin? Some people called him the “fifth” Beatle. I found that the Chatbot incorporated my prior questions and answers, and appeared to get smarter about this subject pretty quickly. Impressive!


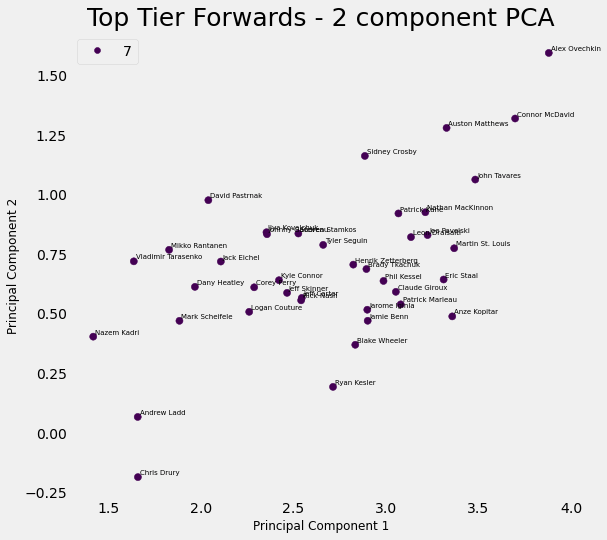
What makes an NHL winner?
Using unsupervised learning and logistic regression on real NHL data to determine what it takes to win in pro hockey
I’ve been working on a new side project, and I’ve posted some of this on Kaggle. I’m trying to use NHL player and team data to determine how to build a winning team. I used k-means clustering, PCA, and logistic regression to accomplish this. My sense is that NHL GMs still determine how to build a team in a smoke-filled room, without a lot of analytics, although maybe I’m wrong. But looking on Kaggle or even some web sites dedicated to hockey analytics, I’ve never seen something similar, so I think it’s pretty innovative work (if I do say so myself).
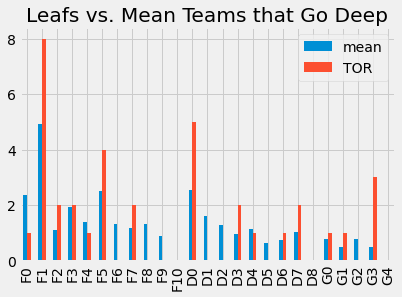
The idea of this analysis is to use NHL player and team performance data to determine the characteristics of a high-performing NHL team, i.e., what mix of players do they have? With a model like this, we can look at the roster of a team, and determine their chances of going deep into the playoffs, and we can also make suggestions about what kinds of player moves they must make in order to become a great team.
I decided to use regular season player statistics, because this ensures we have a lot of data on every player in the league. However, to determine if a team is a high-performer, I used playoff performance, not regular season performance. It might be worth trying to use regular season data, but playoff performance is the ultimate test, and arguably the nature of the game changes in the playoffs. So I used playoff wins as the performance measure for a good team.
My approach was as follows:
- Use k-means clustering to create clusters of similar players. I used three different groupings–forwards, defenders, and goalies, and created clusters within each grouping
- Use those clusters to characterize the 32 NHL teams for each season between 2008/9 and 2021/22. How many players from each cluster do the teams have?
- Then use logistic regression to see if we can find relationships between teams having certain mixes of players, and going “deep” in the playoffs. e.g., What’s the relationship between having a forward from cluster 3 and going deep in the playoffs? If we know that, we know how important it is to have such players on your roster, and we can draw conclusions regarding the player moves teams should attempt to make in order to improve.
You can look at my Python notebook on Kaggle here, or paste this into your browser: https://www.kaggle.com/code/mesadowski/what-makes-an-nhl-winner