Tag Archives: technology

E-mail Q&A Automation using Box AI and Power Automate

Here’s a blog post I contributed to the Box Developer Blog.  It explains how you can use Box AI and Microsoft Power Automate to automate email replies to your customers’ FAQs. It’s easy to do and quite powerful!

Introduction

Does your business have customers that contact you by e-mail with routine questions? Are many of these questions repetitive and routine? In the Commercial Real Estate business, tenants of large properties typically e-mail questions to a building management team, who answers these using a shared e-mail box. Sample questions might be “where can I park my bike?”, or “what are the rules for contractors while on site?” We’d like to automate the answering of routine, repetitive questions, while focusing team-member efforts on answering the more difficult, non-routine questions.

Solution Overview

In this blog post, I’ll show how you can create a Power Automate cloud flow that receives e-mails, calls the Box AI API to generate automated answers to common questions, and replies by e-mail to customers who originated the questions.

Details

To get started, we need one or more Frequently Asked Questions (FAQ) documents. These should contain the top questions we get from our customers, as well as the answers. We’ll put these into a Box hub (a collection of content) in Box. We need to note the Box ID of the hub, since we’ll need that later for the Box AI API calls in our Power Automate flow. You can get the Box hub ID from the URL in your browser when you view a hub in Box.

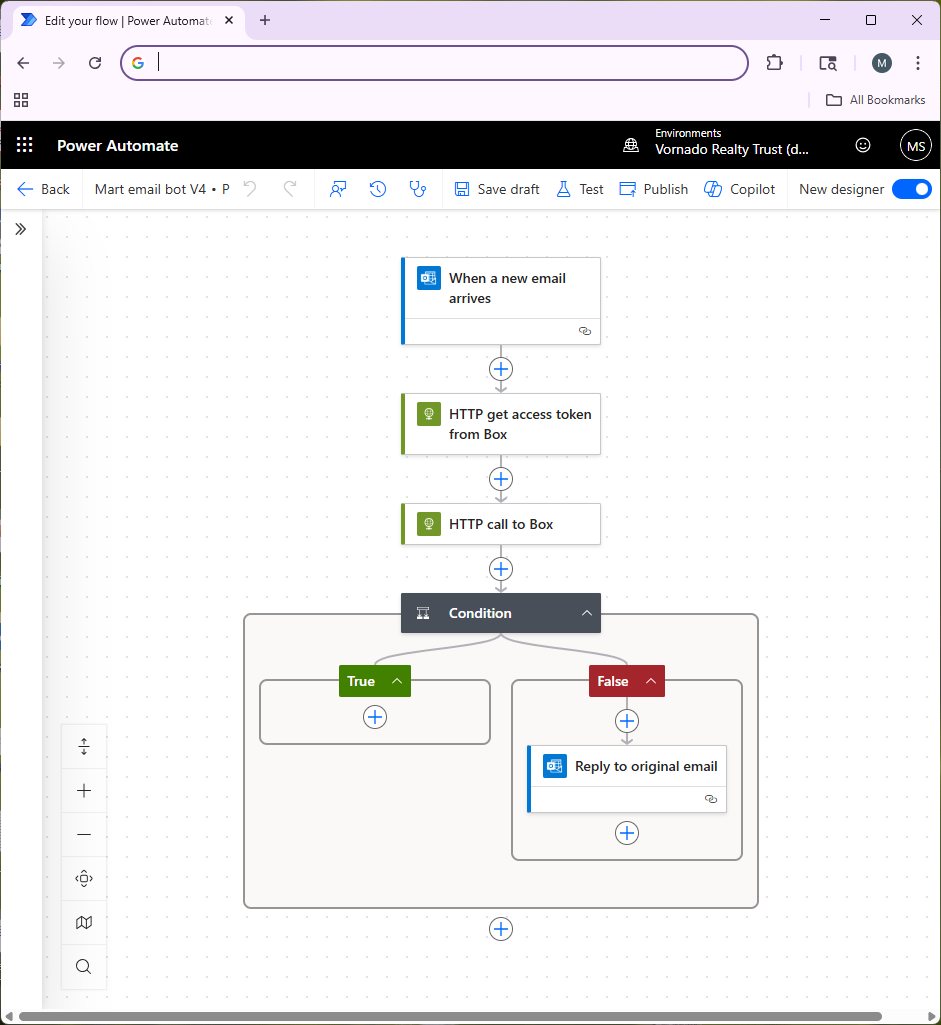
Figure 1 shows an overview of the Microsoft Power Automate flow that manages this process. First, we receive an e-mail into a specific Office 365 e-mail box. You might want to create a special e-mail box for questions from your customers so it’s clear that every e-mail to that account is a question to be answered. Receiving an e-mail triggers our Power Automate flow.

Figure 1: Power Automate Flow.

Next, our Power Automate flow makes an API call to authenticate to the Box API (the step called “HTTP get access token from Box”). Ahead of time, you should use the Box Developer Console to set up a Box Platform App (using Client Credentials Authentication) and get that approved by your Box Administrator. This lets you create credentials for the Box API, which we store as environment variables in Power Automate. Ensure that you go into the Box web UI and collaborate the hub containing your FAQ documents with the service account for your Platform App so that it has access to the content in the hub. This is important — you will get errors from the Box API if your Box Platform App doesn’t have access to your hub.

In the next step in the flow (“HTTP call to Box”), we take the user’s question from their e-mail and send it to the Box AI API. Figure 2 shows how to do that in more detail.

FIgure 2: Details of Box AI API Call.

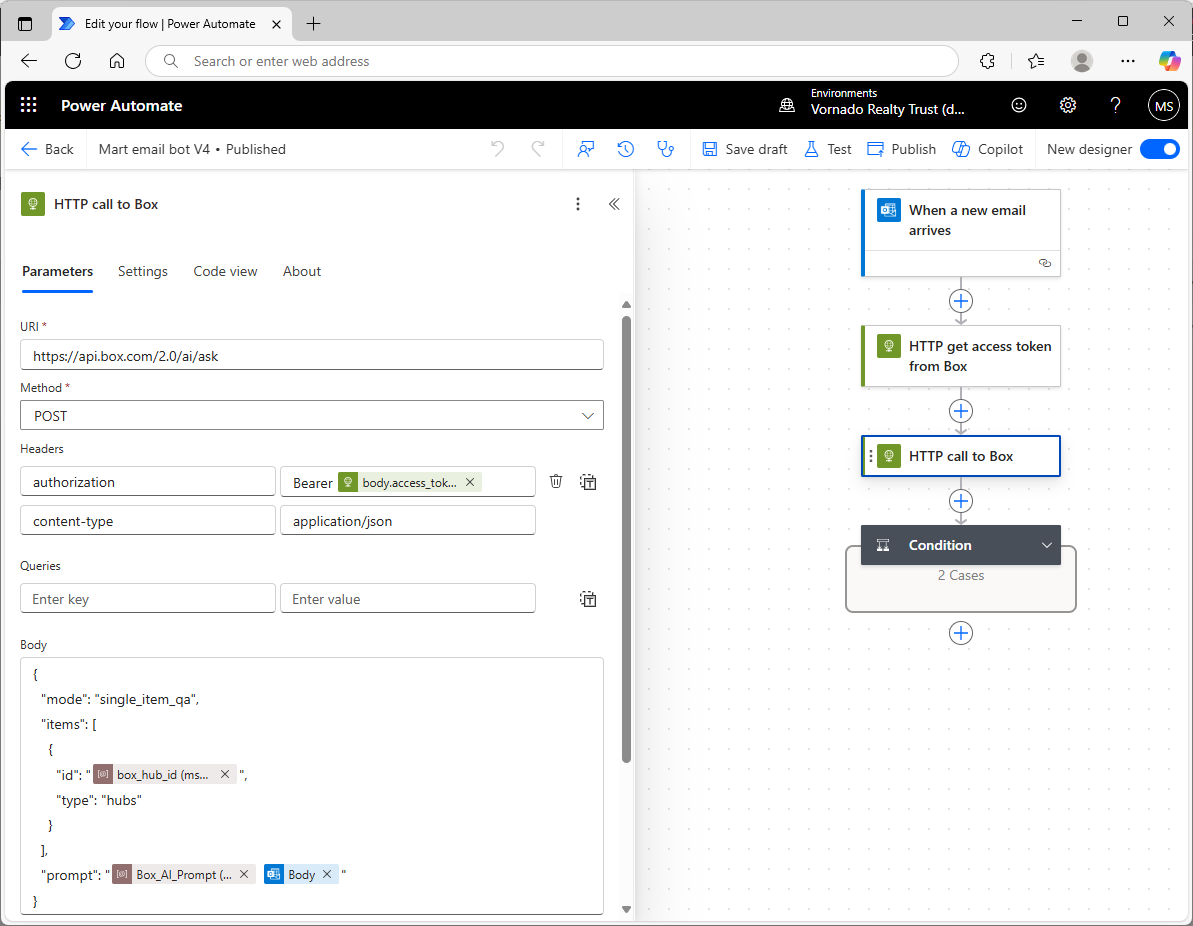
Power Automate has a standard action for making an HTTPS call. Using that, we’ll make a POST to the Box AI API, providing the token we got back from Box in the earlier authentication step, and the Box ID of our hub. We’ll also provide a prompt to Box AI. The prompt contains two parts:

  • the contents of a Power Automate environment variable called Box_AI_Prompt (you’ll need to create that in your Power Automate solution), which provides instructions to Box AI regarding what it should do (i.e., create an e-mail reply to an e-mail we receive from our customer, be concise, etc.), and
  • the question that the user asked in their e-mail (the e-mail body). This might include some HTML formatting, so the prompt can tell Box AI to ignore that.

Box AI tries to find the answer in the FAQ documents and sends it back in the Box API response. We don’t want any hallucinations, or use of general knowledge the LLM may have picked up in it’s training. So if the answer’s not in the document in Box, our prompt instructs Box AI to simply reply “I don’t know” and nothing further. You will probably need to experiment with your prompt to get the results you want.

Next, we have a Power Automate “condition” step. This is how we implement if-then statements in Power Automate. This step checks whether Box AI replied “I don’t know.” If Box AI didn’t say “I don’t know” then it means it was able to come up with a good answer using the FAQ content in the hub, so Power Automate will send an e-mail reply to the user that sent the original question. If Box AI did reply “I don’t know”, then we don’t send any e-mail reply at all. In that case we’re leaving this question to the people monitoring the e-mail box, and the AI e-mail bot gets out of the way.

Some Advice, and Next Steps

Left to its own devices, Box AI might add superfluous content to the e-mails it generates, such as salutations (“Dear John:”), or it might add a signature to the e-mail. You’ll learn this when you test your bot. In order to ensure you have full control over the content of your replies, it’s best to tell Box AI to suppress this kind of content (do that by giving very clear instructions in your prompt) and just provide the answers directly based only on content in the hub. Then you can wrap the Box API response (in the Power Automate e-mail reply step) with your own signatures, logos, etc.

In the future, it will probably worth trying some of Box’s newer AI functionality. Box AI Studio lets you give the AI agent some additional background, or a kind of “persona.” It also lets you select different LLMs, so it’s probably worth testing these to find out which ones provide the best results for your situation.

AI Chatbot to Control Spotify!

Large Language Models (LLMs) have an amazing ability to generate text based on a user’s prompt. But can we use LLMs to actually control a real world “thing?” Or are they really just useful for generating text?

It turns out that using an LLM to control something in the real world is quite doable now. Using OpenAI’s tools functions, we can give an LLM like OpenAI enough knowledge to let it choose an external API to call, based on the situation at hand. We “force” OpenAI to select an API call, rather than just blather on using unstructured text, like it ordinarily does. The API could be used to control another software application, or it could even control a physical object like a robot.

So, for example, what if a user is trying to brainstorm a list of songs, and use it to create a Spotify playlist? OpenAI should help us take that list of songs and feed it to the Spotify API that creates a playlist. Or if the user wants to start playing a certain album, the LLM should help us call the Spotify API to play the album by giving us the exact Spotify API call to make, and the specific parameters to use (e.g., album name, artist). Then our software can do the rest, by making the appropriate API call.

Current Functionality

My chatbot includes the following functionality:

  • Have a conversation about music that (hopefully) results in some suggested tracks. The user can then ask the bot to add the tracks to their Spotify queue or a playlist
  • List your current Spotify playlists
  • Create a new Spotify playlist based on some tracks, or add tracks to an existing playlist
  • List the tracks within a playlist, or on an album
  • Add tracks to the queue
  • Start to play a specific album, song, or playlist
  • List the top tracks for an artist (according to Spotify)
  • Pause play
  • Start playing again

How it Works

Streamlit provides a basic framework for a web chatbot. Once the user types their prompt into the chatbot, we send it to OpenAI’s API. However, a key thing we do in our API call to OpenAI is to utilize OpenAI’s “tools” capabilities. Our tools.py file (see Github) explains to OpenAI all of the API functions we want it to consider when responding to the user’s prompt. This biases OpenAI towards providing us with an API call, rather than just some text. If OpenAI responds with a “tools” call we run some code that helps us call the corresponding Spotify API, interpret the result, and display it to the user in the chatbot. So, for example, if the user is conversing with the chatbot about Bowie’s top songs, the user might ask the bot to create a playlist using those tracks. OpenAI will realize that we should use the Spotify API call to create a new playlist, and feed in those Bowie tracks as parameters. Then, Spotify will create the new playlist. So we’ve taken a conversation about music with a chatbot, and turned it into a real-world action–creating a Spotify playlist in your Spotify account.

Steps to Set Up the Chatbot

You’ll want to modify the code to your preferences. But to get started, follow these steps:

1. Create an “App” in the Spotify Console

First, create a Spotify App in the Spotify Developer Console. You can see how to do that here. You’ll get a couple of important items that you’ll need later: your Spotify Client ID and your Spotify Client Secret. I believe you may need to be a premium Spotify account holder to use the API.

2. Get an OpenAI API Key

Create an OpenAI developer account using their API console and get an API key. You’ll need to provide your credit card and put down some money, but the costs for LLM services have been dropping like a rock lately. So just put down a few dollars and keep an eye on your usage. We’ll use OpenAI’s 4o-mini model, which is a great value. It’s much less expensive than their prior models, and seems to work very well for applications like ours. And it’s quite fast.

3. Install the Python Libraries

My code is in Github. The key libraries you’ll need to install are:

  • spotipy: A Python SDK for the Spotify API
  • openai: Python SDK for using OpenAI
  • streamlit: A basic web server tool that we’ll use to build the chatbot

4. Download the Github Files

Download the files from my Github repo to your local machine. You can also use a server, but it’s best to get it working locally first. That will be enough to control your own Spotify player, although you’d need to deploy it on a server to make it available to others.

5. Edit the Config File

Edit the following values in the config.toml file:

  • client_id: This is the Spotify API Client ID you got from the Spotify API Console
  • client_secret: This is the Spotify API Client Secret, also from Spotify’s Console
  • redirect_uri: A URL to your application that Spotify will invoke as part of the authentication process. If this is your local workstation/PC, then you can use http://127.0.0.1:8501. If this is a server, use the IP of the server with the 8501 port. 8501 is the port used by Streamlit to receive incoming requests. You also need to enter this URL in the Spotify API console as a redirect URI for your Spotify “App.” It should be EXACTLY the same as in the config file. The reason you need to enter your URL in the Spotify console is that Spotify wants to ensure (for security reasons) that the authentication process redirects only to machines that the app developer (i.e., you) knows about, so nobody can hijack your app.

6. Create an Environment Variable for the OpenAI API Key

On Linux or a Mac, go to the command line and use a statement like this (you can look up how to do this in Windows, if needed):

export OPENAI_API_KEY=<Your OpenAI Key goes here>

7. Run the Streamlit application

Streamlit is a Python framework for creating basic web applications and chatbots. The main file for our app is spotify.py. Additionally, tools.py and utils.py are used by the main file, as is the config file: config.toml. Start up the web site by cd’ing to the directory that holds the program files and typing (from the command line):

streamlit run spotify.py

If all goes well, Streamlit will tell you that you can fire up your chatbot in a browser with a URL like http://localhost:8501 (for a local Mac or PC installation), or http://xx.xx.xx.xx:8501 for a server-based installation, where xx.xx.xx.xx is the IP address of the server. The most common issues you might encounter will be failure to enter the correct parameters in the config.toml file or to create the correct OpenAI key as an environment variable, or failure to correctly enter the redirect URI in the Spotify API console.

8. Spotify Authentication

When a user hits the Streamlit web site, they must authenticate with Spotify in order to let the web app access the user’s Spotify data, and have the ability to take action on behalf of the user. Once the user pulls up the Streamlit web site, they’ll see a screen like this:

The user should click the Log In to Spotify button, and this starts the authentication process. The user will be normally be taken to a Spotify web page where they must enter their password or enter a code sent to their email address. They must accept the “scope” of our application, which means they accept that the app can see certain data, and modify it. Each user authenticates separately. The cool thing about this is that the application can access their personal Spotify playlists, and create new playlists on their behalf, etc. The app requires the user to authenticate each time they use the app because we don’t keep their Oauth2 token and authorization code around on the server, and because the token that Spotify provides our app is valid only for a limited time (about an hour).

Authentication is the trickiest part of the project. You might need to fiddle with this a while. If you leave out a step, or if the redirect URI that you entered in the config.toml file doesn’t match EXACTLY the redirect URI’s you entered in the Spotify API console for your Spotify App, it won’t work.

I tried to fire this up in the cloud using Amazon Lightsail Containers, but I believe the load balancer that’s in front of the AWS container was mucking things up, and I wasn’t able to authenticate to Spotify. I was more successful with Amazon Lightsail Instances, and got this working in a short time. There’s no load balancer in front of the instance unless you explicitly put one there, so that seems to simplify things. A Linux Lightsail instance (i.e., virtual server) that’s sufficient for this project costs only $7-$12/month, and they sometimes offer free trials (I got 90 days free).

9. Using the Spotify Chatbot!

Once you get this working, you’ll probably want to modify it to suit your needs. A few words of wisdom:

  • Modify the prompts and tools functions based on the results you’re getting. If you find that you would have expected OpenAI to make a certain tools call, after the user enters certain user prompts, and that doesn’t happen, then experiment with the prompts and tools definitions. Make if very clear to OpenAI what function call to use in various circumstances, if it’s not doing that. Look in the tools.py file to see how I handled it.
  • Error handling can be tricky with the Spotify API – I’ve tried to handle typical errors that might crop up, but sometimes you might find that I assumed a certain format for the Spotify API response, and that didn’t occur. So you can certainly improve upon this.
  • You DO need to have the Spotify app installed and fired up on whatever device you are using this on. So if you’re running this on a web browser on your Mac, ensure you have the Spotify Mac app installed and running on your Mac.
  • I’ve primarily tested this on a Mac. In theory it should work on other devices but I found that it didn’t work quite as well on an iPhone (it seemed like the user got kicked out after a short time and had to keep reauthenticating). So getting this working smoothly on other devices would require some additional work.
  • Certain Spotify API functions will only work if you have the Spotify app running and a song is playing. e.g., you can’t pause playback if the app isn’t playing.